Ever wondered how to streamline the management and monitoring of virtual machines in your Proxmox environment? QEMU Guest Agent is a game-changer, offering tools that significantly enhance the way you interact with virtual systems. Let’s dive into how this tool can transform your setup.
What Makes QEMU Guest Agent Indispensable?
Time Synchronization: Keeping time consistent across your virtual machines and the host can be tricky, but QEMU Guest Agent automates this, ensuring that time-sensitive operations run smoothly.
Power Management: Imagine being able to shut down or reboot your virtual machines right from the Proxmox panel — no need to log in to each VM. It’s not only convenient but also a time saver.
System Monitoring: Get detailed insights into file systems, network activities, and other operational parameters directly from your host. This level of monitoring allows for timely diagnostics and adjustments.
Disk Management: Handling disk operations without having to intervene directly on the VM makes backing up and restoring data more straightforward than ever.
Setting Up QEMU Guest Agent on Your Proxmox Server
Getting started with QEMU Guest Agent involves a few simple steps:
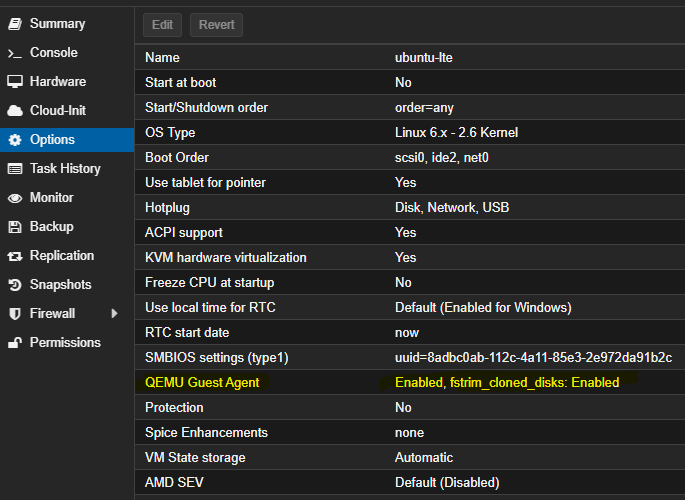
Enable the Agent: Log in to your Proxmox panel, go to the ‘Options’ section of your desired VM, and make sure the ‘QEMU Guest Agent’ option is checked.
Next up, installing it on an Ubuntu VM:
Install QEMU Guest Agent
Shell
1
2
3
sudo apt-getinstall qemu-guest-agent
sudo systemctl start qemu-guest-agent
sudo systemctl enable qemu-guest-agent
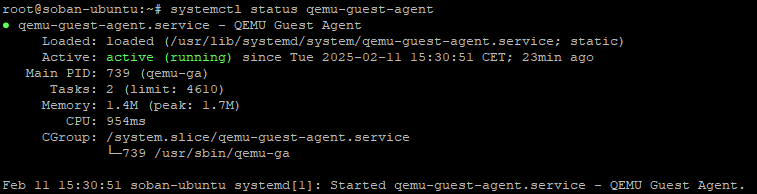
To check whether the qeumu-guest-agent that can make the change is working properly:
Check agent
Shell
1
systemctl status qemu-guest-agent
The QEMU Guest Agent doesn’t just make life easier by automating the mundane tasks — it also enhances the security and efficiency of your virtual environment. Whether you’re managing a single VM or a whole fleet, it’s an invaluable addition to your toolkit.
Automation of Disk Space Management in a Linux Environment
In today’s digital world, where data is being accumulated in ever-increasing amounts, managing disk space has become a key aspect of maintaining operational efficiency in systems. In this article, I will present a script that automates the process of managing space on a remote disk mounted via SSHFS, particularly useful for system administrators who regularly deal with filling storage media.
Prerequisites
Before starting, ensure that SSHFS and all necessary packages enabling its proper operation are installed on your system. SSHFS allows remote file systems to be mounted via SSH, which is crucial for our script’s operation. To install SSHFS and the necessary tools, including a package that enables password forwarding (sshpass), use the following command:
Installing SSHFS and sshpass
Shell
1
2
apt-getupdate
apt-getinstall sshfs fuse sshpass-y
Bash Script for Disk Space Management
Our Bash script focuses on monitoring and maintaining a defined percentage of free disk space on a remote disk mounted via SSHFS. Here are the script’s main functions:
Goal Definition:
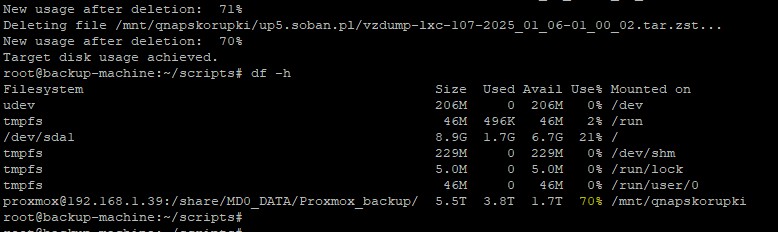
TARGET_USAGE=70 – the percentage of disk space we want to maintain as occupied. The script will work to keep at least 30% of the disk space free.
Mount Point and Paths:
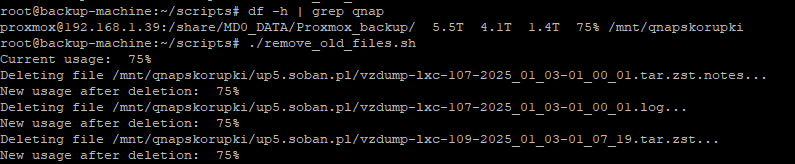
MOUNT_POINT=”/mnt/qnapskorupki” – the local directory where the remote disk is mounted. TARGET_DIRS=”$MOUNT_POINT/up*.soban.pl” – the directories where the script will look for files to delete if needed.
Function check_qnap: This function checks whether the disk is mounted and whether the mount directory is not empty. If there are issues, the script attempts to unmount and remount the disk using sshfs with a password forwarded through sshpass.
File Deletion: The script monitors disk usage and, if TARGET_USAGE is exceeded, it finds and deletes the oldest files in specified directories until the target level of free space is achieved.
Full Bash Script
Shell
1
2
3
4
5
6
7
8
9
10
11
12
13
14
15
16
17
18
19
20
21
22
23
24
25
26
27
28
29
30
31
32
33
34
35
36
37
38
39
40
41
42
43
44
45
46
47
48
49
50
51
52
53
54
55
56
57
58
59
60
61
62
63
64
65
66
67
#!/bin/bash
TARGET_USAGE=70
MOUNT_POINT="/mnt/qnapskorupki"
TARGET_DIRS="$MOUNT_POINT/up*.soban.pl"
# Function to check and mount SSHFS
functioncheck_qnap{
local remote_path="/share/MD0_DATA/backup_proxmox/"
local user_remote="remote_user"
local remote_host="192.168.1.XX"
local port=22
local password='XXXXXXXXXXXXXXXXXXXXXXX'
# Check if the mounting directory exists and is empty
if[!-d"$MOUNT_POINT"]||[-z"$(ls -A $MOUNT_POINT)"];then
echo"Problem: The directory $MOUNT_POINT is missing or empty. Attempting to remount..."
# Unmount if anything is currently mounted
ifmountpoint-q$MOUNT_POINT;then
echo"Unmounting $MOUNT_POINT..."
fusermount-u$MOUNT_POINT
sleep5
fi
# Remount
echo"Mounting SSHFS: $user_remote@$remote_host:$remote_path to $MOUNT_POINT..."
The script uses a password directly in the command line, which can pose a security risk. In practical applications, it is recommended to use more advanced authentication methods, such as SSH keys, which are more secure and do not require a plaintext password in the script. However, in the case of QNAP, we used a password when writing this script.
Conclusion
The presented script is an example of how daily administrative tasks, such as disk space management, can be automated, thus increasing efficiency and reliability. Its implementation in real IT environments can significantly streamline data management processes, especially in situations where quick response to changes in disk usage is critical.
Automatically Shutting Down Your Laptop at Low Battery Levels
Maintaining long battery life and protecting data are crucial for laptop users. In this article, we’ll show you how to create a simple Bash script that automatically shuts down your laptop when the battery level falls below 20%. Additionally, you’ll learn how to set up a crontab to run the script every 10 minutes, ensuring continuous monitoring.
Creating a Bash Script
The Bash script we have prepared will check the current battery level and compare it to a set minimum threshold. If the battery level drops below this threshold, the script initiates a system shutdown, helping to protect your data and hardware.
Battery Check Script
Shell
1
2
3
4
5
6
7
8
9
10
11
12
13
14
15
16
#!/bin/bash
# Define the minimum battery level before shutdown
echo"Battery level is $current_level%, which is below the threshold of $MIN_BATTERY_LEVEL%. Shutting down..."
# Shutdown command
/sbin/shutdown-hnow
else
echo"Battery level is $current_level%, no need to shut down."
fi
Also you can download script:
Download script
Shell
1
wget https://soban.pl/bash/check_battery.sh
Don’t forget to grant permissions to run it:
Permision to run script
Shell
1
chmod+xcheck_battery.sh
Crontab Configuration
Crontab is a tool that allows you to schedule tasks in the Linux system. With it, we can set up regular battery checks.
Crontab Configuration
Shell
1
2
3
4
crontab-e
# Add the following line to crontab to run the script every 10 minutes
*/10****/root/check_battery.sh>/dev/null2>&1
Summary
With this setup, you can rest assured about the condition of your laptop even during intensive use. Automatic shutdown at low battery levels not only protects the equipment but also helps maintain a longer battery life.
Expanding disk space in Linux virtual machines is a key aspect of server system management. In this article, we show how to effectively increase disk space using LVM and fdisk tools, based on real system data.
Preliminary Preparations
Before making changes to partitions and volumes, it is important to check the current state of the disks in the system. We will use the lsblk command to identify available disks and partitions.
Shell
1
lsblk
Here is an example of the lsblk command output on a machine:
Shell
1
2
3
4
5
6
7
8
9
10
11
12
NAME MAJ:MIN RMSIZE RO TYPEMOUNTPOINT
loop07:0055.7M1loop/snap/core18/2829
sda8:0042G0disk
├─sda18:10512M0part/boot/efi
├─sda28:201G0part/boot
└─sda38:3040.5G0part
└─ubuntu--vg-ubuntu--lv253:0078.5G0lvm/
sdb8:160350G0disk
└─sdb18:17060G0part
└─ubuntu--vg-ubuntu--lv253:0078.5G0lvm/
sr011:011024M0rom
Creating Snapshots
Before making changes to disk configurations, it is advisable to create a snapshot of the LVM volumes to ensure data can be restored in case of unexpected issues.
Next, we proceed to modify the partitions using fdisk. We remove the existing partition and then create a new one that utilizes the entire available space on disk sdb.
Shell
1
fdisk/dev/sdb
Saving Changes
After properly configuring the partitions, we use the w command in fdisk to save the changes and update the partition table.
Shell
1
Command(mforhelp):w
Executing pvscan
After modifying the partitions, we execute the pvscan command so the system can update information about available physical volumes.
Shell
1
pvscan
Configuring LVM
After saving changes to the partition table, we need to update the LVM configuration to include the new disk space. We use the lvextend command with automatic file system resizing.
Shell
1
lvextend-l+100%FREE/dev/ubuntu-vg/ubuntu-lv-r
Summary
Expanding disk space on a Linux virtual machine enhances performance and the availability of storage space. Thanks to the steps described, managing disk space in systems using LVM becomes simpler and more efficient.
Managing Proxmox clusters can sometimes present technical difficulties, such as inconsistencies in cluster configuration or issues with restoring LXC containers. Finding and resolving these issues is crucial for maintaining the stability and performance of the virtualization environment. In this article, I present a detailed guide on how to diagnose and resolve an issue with an unreachable node and how to successfully restore an LXC container.
Before you begin any actions, make sure you have a current backup of the system.
Diagnosing the State of the Proxmox Cluster
Shell
1
2
pvecm delnode up-page-02
Node/IP:up-page-02isnotaknown host of the cluster.
and:
Shell
1
2
pct restore107vzdump-lxc-107-2024_11_12-03_00_01.tar.zst--storage local
CT107already exists on node'up-page-02'
To understand the state of the cluster, execute the following command on the node-up-page-04 node:
Shell
1
pvecm nodes
Expected output:
Shell
1
2
3
4
5
Membership information
----------------------
Nodeid Votes Name
11node-up-page-01
21node-up-page-04(local)
Then check the detailed cluster information with the following command:
Shell
1
pvecm status
Expected output:
Shell
1
2
3
4
5
6
7
8
9
10
11
12
13
14
15
16
17
18
19
20
21
22
23
24
25
26
27
28
29
Cluster information
-------------------
Name:soban-proxmox
Config Version:4
Transport:knet
Secure auth:on
Quorum information
------------------
Date:Wed Nov1310:40:122024
Quorum provider:corosync_votequorum
Nodes:2
Node ID:0x00000002
Ring ID:1.e6
Quorate:Yes
Votequorum information
----------------------
Expected votes:2
Highest expected:2
Total votes:2
Quorum:2
Flags:Quorate
Membership information
----------------------
Nodeid Votes Name
0x000000011<masked IP>
0x000000021<masked IP>(local)
Removing the Container Configuration File and Cleaning Data
I discovered that the configuration file for container 107 still exists on the cluster’s file system at the path:
The restoration process was successful, and the container was ready for use. This case illustrates the importance of thorough diagnostics and configuration file management in Proxmox when working with clusters. Regular reviews of configurations are advisable to avoid inconsistencies and operational issues in the future.
During daily work with MySQL databases, specific challenges such as missing tables or errors related to the unrecognized database performance_schema can arise. These problems can significantly affect the performance and stability of database systems, and their diagnosis and resolution can often be complicated and time-consuming. To facilitate this task, I have created this guide, which is the result of my experiences and proven practices. I provide a comprehensive approach to identifying and fixing issues related to performance_schema. It’s quite simple to import the schema from a newly built database.
Of course, it’s best to perform a backup of the database before the entire operation.
Initial Diagnosis in MySQL
Start by identifying the problem in the MySQL shell:
Ensure the following packages are installed to handle Kerberos authentication and mounting CIFS filesystems:
Install Packages
Shell
1
apt install krb5-user cifs-utils keyutils
Kerberos Ticket Initialization
Initialize the Kerberos ticket with the following command:
Initialize Kerberos
Shell
1
kinit yourname@yourdomain.com
To verify the ticket’s validity and see details, use:
Verify Ticket
Shell
1
klist
Manual Resource Mounting
To manually mount a CIFS resource, use the command below. Replace yourserver/yourresource and /your/mountpoint with the appropriate server address and local mount point:
These settings are crucial for ensuring secure and reliable access to network resources using Kerberos on Linux systems. Always ensure your Kerberos tickets are valid and renew them as necessary. For any issues related to mounting or authentication, refer to the system logs or consult your system administrator.
Virtualization servers based on Debian family systems, such as Proxmox, are often used in test environments where continuous availability is crucial. Sometimes these servers are installed on laptops, which serve as low-budget or portable solutions. However, the standard power management settings in laptops can lead to undesirable behaviors, such as sleeping or hibernating when the lid is closed. Below, I describe how to change these settings in an operating system based on Debian to ensure uninterrupted server operation.
Step 1: Accessing the Configuration File
Open the terminal and enter the following command to edit the /etc/systemd/logind.conf file using a text editor (e.g., nano):
Editing logind
Shell
1
nano/etc/systemd/logind.conf
Step 2: Modifying logind Settings
Find the line containing HandleLidSwitch and change its value to ignore. If the line is commented out (preceded by a # symbol), remove the #. You can also add this line to the end of the file if it does not exist.
Shell
1
HandleLidSwitch=ignore
Step 3: Applying and Restarting the Service
After making the changes and saving the file, you need to restart the systemd-logind service for the changes to take effect. Use the following command in the terminal:
Resetting systemd-logind
Shell
1
systemctl restart systemd-logind
With these changes, closing the laptop lid will no longer initiate hibernation or sleep, which is especially important when using Debian-based servers, including Proxmox, as server solutions.
Managing SWAP memory is a key element in administering Linux operating systems, especially in virtualization environments like Proxmox. SWAP acts as “virtual memory” that can be used when the system’s physical RAM is full. In this article, we will show how to increase SWAP space on a Proxmox server, using the lvresize tool to free up disk space that can then be allocated to SWAP.
Problem Overview
A user wants to increase SWAP space from 8 GB to 16 GB, but encounters the problem of lacking available space in the LVM volume group, which is required to increase SWAP.
Step 1: Checking Available Space
Shell
1
vgs
The command vgs displays the volume groups along with their sizes and available space.
Step 2: Reducing the Volume
Suppose there is a root volume of 457.26 GB, which can be reduced to free up an additional 8 GB for SWAP. Before reducing the volume, it is necessary to reduce the file system on this volume.
Shell
1
resize2fs/dev/pve/root449.26G
However, in the case of the XFS file system, reduction must occur offline or from a live CD.
Step 3: Using lvreduce
Shell
1
lvreduce-L-8G/dev/pve/root
This command reduces the root volume by 8 GB, which is confirmed by a message about the volume size change.
Step 4: Deactivating SWAP
Shell
1
swapoff-a
Before starting changes in SWAP size, SWAP must first be turned off using the above command.
Step 5: Expanding SWAP
Shell
1
2
3
lvresize-L+8G/dev/pve/swap
mkswap/dev/pve/swap
swapon/dev/pve/swap
The above commands first increase the SWAP space, then format it and reactivate it.
Shell
1
swapon--show
Finally, we verify the active SWAP areas using the above command to ensure everything is configured correctly.
This process shows how you can flexibly manage disk space on Proxmox servers, adjusting the size of SWAP depending on needs. Using lvreduce requires caution, as any operation on partitions and volumes carries the risk of data loss, therefore it is always recommended to make backups before proceeding with changes.
Working with MySQL, you may encounter various errors that can disrupt system operations. Error code 1114 is one of them and indicates a situation where the table the user is trying to write data to is full. This issue is particularly significant in the MySQL replication system, where its resolution is crucial for ensuring work continuity.
Problem Description
Error 1114 manifests itself with the message: “Could not execute Write_rows event on table docs; The table ‘docs’ is full”. This means that new rows cannot be written due to exceeding the size of the temporary table. The detailed error message might look like this:
Login to MySQL:
Login to mysql
Shell
1
# mysql -u root -p
Change variable values:
MySQL change tmp_table_size and max_heap_table_size
MySQL
1
2
SET GLOBALtmp_table_size=268435456;-- Set to 256M
SET GLOBALmax_heap_table_size=268435456;-- Set to 256M
After making these changes, all new connections to the MySQL server will use these updated values. You can verify them by performing:
MySQL check tmp_table_size and max_heap_table_size
MySQL
1
2
SHOWGLOBALVARIABLESLIKE'tmp_table_size';
SHOWGLOBALVARIABLESLIKE'max_heap_table_size';
Or
MySQL check tmp_table_size and max_heap_table_size
MySQL
1
SELECT@@tmp_table_size,@@max_heap_table_size;
Now replication can be resumed and should work better. However, remember to modify the configuration so that after restarting MySQL these variables are set correctly. It may be necessary here to resume replication (if it was previously stopped):
MySQL slave
MySQL
1
START SLAVE;
If the problem has been resolved, at this stage checking the replication status:
MySQL status
MySQL
1
showslave status\G
Should not return any errors.
Modify the configuration file /etc/mysql/my.cnf:
Change config mysql
Shell
1
2
3
4
5
# cat /etc/mysql/my.cnf
...
tmp_table_size=256M
max_heap_table_size=256M
...
Restart MySQL service:
Restart mysql
Shell
1
# systemctl restart mysql
Before restarting the service, it is recommended to execute SHUTDOWN; in the MySQL client. Remember to resume replication.
Important Notes
System Resources: Ensure the server has sufficient RAM to handle the increased variable values.
Performance Monitoring: After making the changes, monitor performance to verify that the problem has been resolved.
Configuration Durability: Changes to the configuration file should be permanent to avoid resetting values after a restart.
Additional Verification Steps
Check Available Disk Space: The problem might also stem from lack of available disk space. This can be verified using the following command:
Check disk
Shell
1
# df -h
Summary
Resolving the issue associated with error code 1114 in MySQL replication requires understanding and adjusting the system configuration. The described steps show how increasing the size of the temporary table can prevent this error, enabling smooth operation of the replication system.