In today’s world, where data is becoming increasingly valuable, proper backup management is crucial for the security of information systems. In this article, I present an effective way to automate the backup of key configuration files in Proxmox-based systems using a simple bash script and Crontab configuration.
Bash Script for Backup of the /etc Directory
The /etc file contains critical system configuration files that are essential for the proper functioning of the operating system and various applications. Loss or damage to these files can lead to serious problems. Below, I present an effective script, backup-etc.sh, that allows for the automated backup of this directory:
Generates the current date and time, which are added to the name of the archive to easily identify individual copies.
Uses the tar program with zstd compression to create an archived and compressed copy of the /etc directory.
Removes archives older than 100 days from the /var/lib/vz/dump/ location, thus ensuring optimal disk space management.
Adding Script to Crontab
To automate the backup process, the script should be added to crontab. Below is a sample configuration that runs the script daily at 2:40 AM:
Editing crontab
Shell
1
2
# crontab -e
402***/root/backup-etc.sh>/dev/null2>&1
Redirecting output to /dev/null ensures that operations are performed quietly without generating additional output to standard output.
Download the Script from soban.pl
The backup-etc.sh script is also available for download from the soban.pl website. You can download it using the following wget command and immediately save it as /root/backup-etc.sh:
With this simple command, the script is downloaded from the server and granted appropriate executable permissions.
Benefits and Modifications
The backup-etc.sh script is flexible and can be easily modified to suit different systems. It is default placed in the /var/lib/vz/dump/ folder, which is a standard backup storage location in Proxmox environments. This simplifies backup management and can be easily integrated with existing backup solutions.
By keeping backups for 100 days, we ensure a balance between availability and disk space management. Old copies are automatically deleted, minimizing the risk of disk overflow and reducing data storage costs.
Summary
Automating backups using a bash script and Crontab is an effective method to secure critical system data. The backup-etc.sh script provides simplicity, flexibility, and efficiency, making it an excellent solution for Proxmox system administrators. I encourage you to adapt and modify this script according to your own needs to provide even better protection for your IT environment.
Upgrading Apache Cassandra to a newer version is a significant task that database administrators undertake to ensure their systems benefit from new features, enhanced security measures, and improved performance. This guide provides a detailed walkthrough for upgrading Apache Cassandra from version 3.1.15 and higher to the latest 4.1.x version, specifically on Ubuntu 20.04.5 LTS, with an emphasis on pre-upgrade cleaning operations to manage disk space effectively.
Pre-upgrade Preparation
Backup Configuration Directory:
Before initiating the upgrade, it’s crucial to back up the Cassandra configuration directory. This precaution allows for a swift restoration of the configuration should any issues arise during the upgrade process. Utilize the following command to create a backup, incorporating the current date into the folder name for easy identification:
Preparation is key to a smooth upgrade. Begin with maintenance commands to guarantee data integrity and optimize space usage, especially important for systems with limited disk space.
Scrub Data:
Execute nodetool scrub to clean and reorganize data on disk. Given that this operation may be time-consuming, particularly for databases with large amounts of data or limited disk space, it’s a critical step for a healthy upgrade process.
Clear Snapshots:
To further manage disk space, use nodetool clearsnapshot to remove existing snapshots, freeing up space for the upgrade process. To delete all snapshots on the node, simply use this method if you’re running out of space:
clear all snapshot
Shell
1
# nodetool clearsnapshot --all
Cleanup Data:
Perform a nodetool cleanup to purge unnecessary data. In scenarios where disk space is a premium, it’s advisable to execute a scrub operation without generating a snapshot to conserve space:
scrub cassandra
Shell
1
# nodetool scrub --no-snapshot
Draining and Stopping Cassandra
Drain the Node:
Prior to halting the Cassandra service, ensure all data in memory is flushed to disk with nodetool drain.
drain cassandra
Shell
1
# nodetool drain
Stop the Cassandra Service:
Cease the running Cassandra services to proceed with the upgrade safely:
drain cassandra
Shell
1
# systemctl stop cassandra.service
Upgrading Cassandra
Update Source List:
Edit the repository sources to point to the new version of Cassandra by adjusting the cassandra.sources.list file:
With the repository sources updated, refresh the package list and upgrade the packages. When executing the apt upgrade command, you can keep pressing Enter as the default option is ‘N’ (No):
Upgrade cassandra
Shell
1
# apt update && apt upgrade
Modify Configuration:
Adjust the Cassandra configuration for version 4.1.x by commenting out or deleting deprecated options:
deleting deprecated options in cassandra
Shell
1
# for var in thrift_prepared_statements_cache_size_mb start_rpc rpc_port rpc_server_type thrift_framed_transport_size_in_mb request_scheduler; do sed -i "/$var:/s/^/#/" /etc/cassandra/cassandra.yaml; done
Update JAMM Library:
Ensure the Java Agent Memory Manager (JAMM) library is updated to enhance performance:
change jamm version in cassandra
Shell
1
# sed -i 's|jamm-0.3.0.jar|jamm-0.3.2.jar|g' /etc/cassandra/cassandra-env.sh
Backup and update the JVM options file:
It’s a good practice to back up configuration files before making changes. This step renames the existing jvm-server.options file to jvm-server.options.orig as a backup. Then, it copies the jvm.options file to jvm-server.options to apply the standard JVM options for Cassandra servers.
Post-upgrade, it’s beneficial to evaluate and optimize memory usage and swap space to ensure efficient Cassandra operation:
free ram
Shell
1
# swapoff -a && swapon -a
Restart the Cassandra Service:
Apply the new version by restarting the Cassandra service:
start service cassandra
Shell
1
# systemctl start cassandra.service
Verify Upgrade:
Confirm the success of the upgrade by inspecting the cluster’s topology and state, ensuring all nodes are functional:
verify upgrade of cassandra
Shell
1
2
# nodetool describecluster
# nodetool status
By adhering to this comprehensive guide, database administrators can effectively upgrade Apache Cassandra to version 4.1.x, capitalizing on the latest advancements and optimizations the platform has to offer, while ensuring data integrity and system performance through careful pre-upgrade preparations.
Optimization and Verification
After successfully upgrading Apache Cassandra to version 4.1.x and ensuring the cluster is fully operational, it’s crucial to conduct post-upgrade maintenance to optimize the performance and security of your database system. This section outlines essential steps and considerations to maintain a healthy and efficient Cassandra environment.
Monitor Performance and Logs
In the immediate aftermath of the upgrade, closely monitor the system’s performance, including CPU, memory usage, and disk I/O, to identify any unexpected behavior or bottlenecks. Additionally, review the Cassandra system logs for warnings or errors that may indicate potential issues requiring attention.
Tune and Optimize
Based on the performance monitoring insights, you may need to adjust Cassandra’s configuration settings for optimal performance. Consider tuning parameters related to JVM options, compaction, and read/write performance, keeping in mind the specific workload and data patterns of your application.
Run nodetool upgradesstables
To ensure that all SSTables are updated to the latest format, execute nodetool upgradesstables on each node in the cluster. This operation will rewrite SSTables that are not already in the current format, which is essential for taking full advantage of the improvements and features in Cassandra 4.1.x (Check the space, and if required, delete all snapshots as shown above.):
Upgrade sstables
Shell
1
# time nodetool upgradesstables
This process can be resource-intensive and should be scheduled during off-peak hours to minimize impact on live traffic.
Implement Security Enhancements
Cassandra 4.1.x includes several security enhancements. Review the latest security features and best practices, such as enabling client-to-node encryption, node-to-node encryption, and advanced authentication mechanisms, to enhance the security posture of your Cassandra cluster.
Review and Update Backup Strategies
With the new version in place, reassess your backup strategies to ensure they are still effective and meet your recovery objectives. Verify that your backup and restore procedures are compatible with Cassandra 4.1.x and consider leveraging new tools or features that may have been introduced in this release for more efficient data management.
Proxmox VE is a comprehensive, open-source server management platform that seamlessly integrates KVM hypervisor and LXC containers. Today, we present a streamlined process for installing Proxmox VE 8 on Debian 12 Bookworm, based on the official guidance from the Proxmox VE Installation Guide.
Prerequisites
A fresh Debian 12 Bookworm installation.
A user with sudo privileges.
Internet connectivity.
Installation Scripts
We’ve divided the installation into two scripts. The first script prepares your system and installs the Proxmox VE kernel. The second script continues the process after a system reboot, installing the remaining Proxmox VE packages.
Remember, all these commands need to be executed from the root user level, so:
Become root:
Shell
1
# sudo su -
First Part: System Preparation and Kernel Installation
Start by downloading the first script which prepares your system and installs the Proxmox VE kernel:
Downloading and changing permissions in the first script:
echo"Kernel installation completed. The system will now reboot. After rebooting, continue with the second part of the script."
reboot
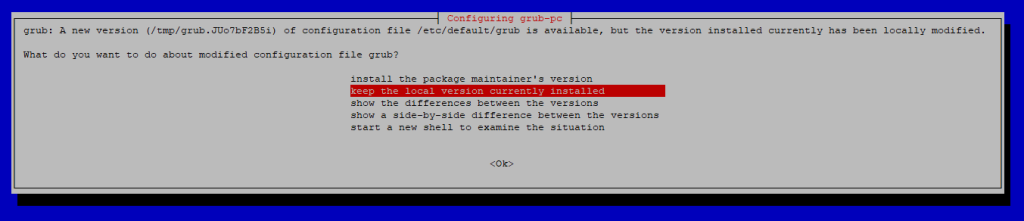
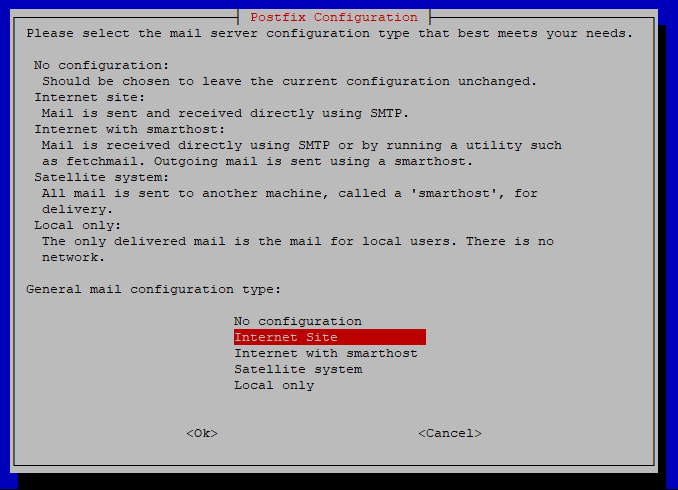
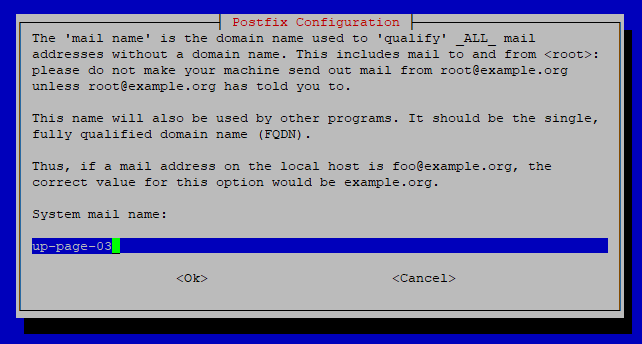
After running the first script, your system will reboot. At this stage, you may encounter a few dialogs from the system, which are part of the normal package configuration steps. For this simplified installation, you can accept the default options by pressing Enter.
Screenshots during Installation
GRUB Configuration – A new version of the GRUB bootloader configuration file is available. It’s recommended to keep the local version currently installed unless you are aware of the changes. As with the previous dialogs, pressing Enter will select the default action.
Postfix Configuration – This dialog appears when installing the postfix package, which is a mail transport agent. The default option “Internet Site” is suitable for most cases. Pressing Enter accepts this configuration.
System Mail Name – Here you specify the FQDN (Fully Qualified Domain Name) for the system mail. The default value is usually adequate unless you have a specific domain name for your server. Again, pressing Enter will continue with the default configuration.
There might be issues encountered towards the end of the first script installation, such as:
The issues at the end of the installation of the first script.
Shell
1
2
3
4
5
Errors were encountered whileprocessing:
ifupdown2
pve-manager
proxmox-ve
E:Sub-process/usr/bin/dpkg returned an error code(1)
However, the second part of the script, executed after the reboot, addresses these problems. After a successful reboot of the machine, log into the system and proceed to the second script.
Second Part: Completing Proxmox VE Installation
After your system has rebooted, proceed with downloading the second script:
Downloading and changing permissions in the second script:
echo"Continuing Proxmox VE installation after reboot..."
# Install upgrade
apt upgrade-y
# Optional: Remove the Debian default kernel
apt remove linux-image-amd64'linux-image-6.1*'-y
update-grub
# Optionally remove the os-prober package
apt remove os-prober-y
# Clean up installation repository entry
rm/etc/apt/sources.list.d/pve-install-repo.list
# Retrieve the server's IP address for the Proxmox web interface link
IP_ADDRESS=$(hostname-I|awk'{print $1}')
echo"Proxmox VE installation completed."
echo"You can now connect to the Proxmox VE web interface using:"
echo"https://$IP_ADDRESS:8006"
echo"Please log in using the 'root' username and your root password."
Once the second script completes, you will be able to access the Proxmox VE web interface using the URL displayed at the script’s conclusion. Log in with the ‘root’ username and your root password.
Upon loading the page, you may encounter a certificate trust error – this is normal at this stage, and you can safely accept that it is unsafe and proceed to access the page for managing Proxmox. If you don’t know the root password, you can reset it by executing ‘passwd‘ as root. Good luck!
In a situation where we have one public IP address and we have many domains directed to that IP address, it is worth considering spreading the traffic to other servers. Proxmox, which allows you to create a pair of virtual machines, is perfect in such a situation. In my case, each virtual machine is separated and the traffic is broken down by nginx, which distributes the traffic to other servers. The virtual machine on my website will redirect traffic, I have the IP address for wordpress: 10.10.11.105 on port 80. In this case, no encryption is required, but the frontend itself, which manages the traffic, will present itself with encryption and security on port 443.
Two machines with the following configuration will participate throughout the process: up-page IP: 10.10.14.200 soban-pl IP: 10.10.11.105
So let’s move on to the frontend that distributes traffic to other machines. The frontend is done by linux debian 11 (bullseye), in addition, I have the following entry in the repository (/etc/apt/sources.list):
cat
Shell
1
2
3
#...
deb http://nginx.org/packages/debian/bullseye nginx
Configuration of the above-mentioned wordpress, additional authorization is also set when you try to log in to wp-admin, you can read about it here: More security wp-admin in nginx.
In the next step, check if the nginx configuration is correct by:
checking nginx configuration
Shell
1
# service nginx configtest
If everything is fine, restart nginx:
restart nginx
Shell
1
# service nginx restart
In a virtual machine with nginx it should also be installed. This is the same as debian linux 11 (bullseye), so the respository should look like this:
cat
Shell
1
2
3
#...
deb http://nginx.org/packages/debian/bullseye nginx
Also in this case, check the correctness of the nginx service configuration:
checking nginx configuration
Shell
1
# service nginx configtest
Everything looks fine, so let’s move on to restarting the service:
restart nginx
Shell
1
# service nginx restart
If the whole configuration was done correctly, the page should be directed without encrypted traffic to the virtual machine with wordpress. A wordpress service with nginx is not the only one that can be hosted or proxied. We can direct traffic from nginx to e.g. jboss, apacha and all other web services. Of course, this requires a corresponding modification of the configuration presented above, but the general outline of the concept as an nginx proxy has been presented. You should also remember about the appropriate configuration of keys and certificates. In my case let’s encrypt works perfectly for this.
There are situations when we need to increase the encryption level on the old system – according to the PCI audit requirements. However, the old system is no longer supported, so updating the encryption level is not possible. This is not a recommended solution, because we should try to transfer the application to a new system. After all, when we have little time, it is possible to hide the old version of the system and allow only the new machine to move to it. In this particular example, we will use mod_proxy as a proxy to redirect traffic to the old machine, while using iptables we will only allow communication with the new machine. It is not a recommended solution, but it works and I would like to present it here. The systems that I will be basing on in this example are the old red hat 5 and the new oracle linux 7. Recently, it has become very important to use a minimum of tls 1.2 and none below for banking transactions. Let’s start with the proxy server configuration oracle linux 7.
As of this writing, the addressing is as follows: new_machine IP: 10.10.14.100 old_machine IP: 10.10.14.101 Traffic will be routed on port 443 from new_machine to old_machine.
Before we go to proxy configuration, please make sure there are network transitions from new_machine (10.10.14.100) to old_machine (10.10.14.101) to port 443. You can read how to verify network connections here: check network connection and open tcp port via netcat.
We go to the installation of apache and mod_proxy:
Installing httpd and mod_proxy
Shell
1
# yum install httpd mod_proxy
After installing apache, go to the edition:
Edit configuration apache
Shell
1
# vi /etc/httpd/conf.d/ssl.conf
Below are the news on the check level, what are the updates, and ip on the next service update:
In order to verify the correctness of apache configuration, you can issue a command that will check it:
checking configuration of apache
Shell
1
# service httpd configtest
If the apache configuration is correct, we can proceed to reloading apache:
Restart apache
Shell
1
# service httpd restart
At this point, we have a configured proxy connection. Before we move on to limiting traffic with iptables, I suggest you go to the site – with the new mod_proxy configured and test if everything is working properly and if there are any problems with the application.
Once everything is working fine, the network transitions are there, we can go to the iptables configuration for red hat 5. Let’s start by checking the system version:
checking version red hat
Shell
1
# cat /etc/redhat-release
Now we are going to prepare iptables so that the network traffic is available on port 443 from the new_machine (10.10.14.100). To do this, edit the file /etc/sysconfig/iptables:
edit /etc/sysconfig/iptables
Shell
1
2
3
4
5
6
7
8
9
10
11
12
13
14
# Firewall configuration written by system-config-firewall
# Manual customization of this file is not recommended.
*filter
:INPUT ACCEPT[0:0]
:FORWARD ACCEPT[0:0]
:OUTPUT ACCEPT[0:0]
-AINPUT-mstate--state ESTABLISHED,RELATED-jACCEPT
-AINPUT-picmp-jACCEPT
-AINPUT-ilo-jACCEPT
-AINPUT-ptcp--dport443-s10.10.14.100-jACCEPT
-AINPUT-ptcp--dport443-jDROP
-AINPUT-ptcp--dport80-jDROP
-AINPUT-jACCEPT
COMMIT
After iptables settings are correct, we can reload the service:
Restart iptables
Shell
1
# /etc/init.d/iptables restart
In this way, we managed to cover up the weak encryption by proxying and diverting traffic to the new machine. This is not a recommended solution and you should try to transfer the application to a new environment compatible with the new system. However, in crisis situations, we can use this solution. Network traffic is not allowed by other IP addresses, so scanners will not be able to detect weak encryption on the old machine, and users using the old environment will not be able to use it. This does not change the fact that weak encryption is still set in the old environment and needs to be corrected. The example I gave is for the old red hat 5 and the new oracle linux 7, but it can be assumed that a similar solution and configuration is possible for other versions of the system.
Nowadays, many bots or hackers look for port 22 on servers and try to log in. Usually, the login attempt is made as the standard linuxe root user. In this short article, I will describe how to create a user that will be able to log in as root and change the default ssh port 22 to 2222. Let’s go:
creating new user
Shell
1
useradd-msoban-s/bin/bash
This way we created the user ‘soban’ and assigned it the default shell ‘/bin/bash’.
We still need to set a password for the user ‘soban’:
Set password for user
Shell
1
# passwd soban
In the next step, let’s add it to ‘/etc/sudoers’ so that it can become root. Keep in mind that once the user can get root, he will be able to do anything on the machine!
edit /etc/sudoers
Shell
1
# vi /etc/sudoers
Please add this entry below:
/etc/sudoers
Shell
1
2
#user can made sudo on root (sudo su -)
soban ALL=(ALL)NOPASSWD:ALL
How can we test whether the user has the ability to log in as root? Nothing easier, first we’ll switch to the user we just created:
switch from root to user
Shell
1
# su - soban
To list the possible sudo commands, just type the command:
list sudo command
Shell
1
$sudo-l
Finally, to confirm whether it is possible to log in as root, you should issue the command:
becoming root
Shell
1
# sudo su -
Now that we have a root user ready, let’s try disabling ssh logon directly and change the default port. To do this, go to the default configuration of the ssh service, which is located in ‘/etc/ssh/sshd_config’:
edit config sshd
Shell
1
# vi /etc/ssh/sshd_config
We are looking for a line containing ‘Port’ – it can be hashed, so it should be unhashed and ‘PermitRootLogin’. Then set them as below:
setup /etc/ssh/sshd_config
Shell
1
2
Port2222
PermitRootLogin no
In this way, we changed the default port 22 to 2222 and disallowed the possibility of logging in directly to the root user. However, the ssh service still needs to be reloaded, in debian or kali linux we do it like this:
Restart ssh deamon
Shell
1
# service sshd restart
In this way, we have managed to create a user who can safely log into the ssh service and become root. In addition, after changing the port, we will not go out on port 22 scans, which by default is set and scanned by a potential burglar. Installing the fail2ban service is also a very good improvement in security.
iftop is a command-line tool used for real-time network bandwidth monitoring. It displays a continuously updated list of network connections and the amount of data transferred between them. The connections are listed in a table format and are sorted by either the amount of data transferred or the total number of packets sent or received.
iftop provides a variety of filtering options, allowing you to limit the display to specific hosts, networks, or ports. It also provides support for IPv6, and it can display information about the source and destination IP addresses, port numbers, and protocols.
iftop is particularly useful for monitoring network traffic in real-time and identifying which applications or services are consuming the most bandwidth. It can also help identify network performance issues and can assist in troubleshooting network problems.
Overall, iftop is a powerful and flexible tool for network monitoring and analysis, and it can be a valuable addition to any network administrator’s toolkit.
One of the more useful network traffic monitoring tools I find is iftop. It is especially useful when the link’s throat is flooded. In my experience, it is easy to use it to catch all kinds of network attacks, especially DoS. In the example given below, I will send a larger file to the remote machine and limit its upload speed, in the meantime I will observe the traffic with the iftop tool. Let’s start by installing iftop on the local machine. In this case it is kali linux:
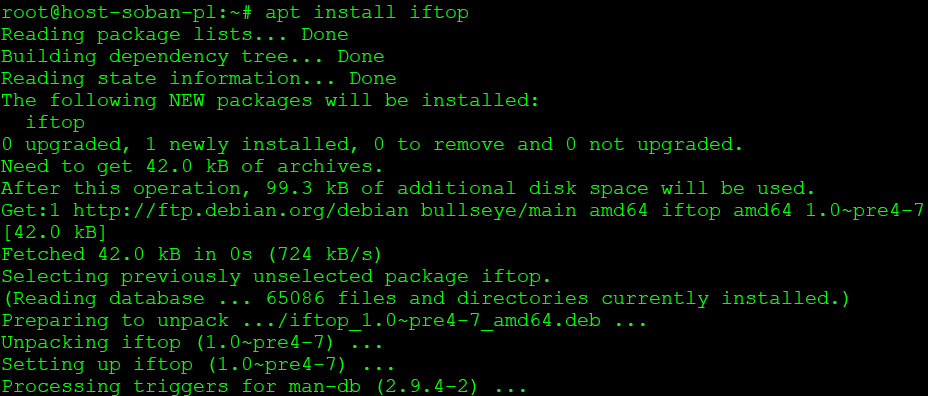
installing iftop utility on kali linux
Shell
1
# apt install iftop
The distribution doesn’t matter in this case, just like it installs on any other operating system, it may well be linux debian.
We will do the same on the remote machine, so let’s move on to installing iftop on linux debian:
installing iftop utility on debian linux
Shell
1
# apt install iftop
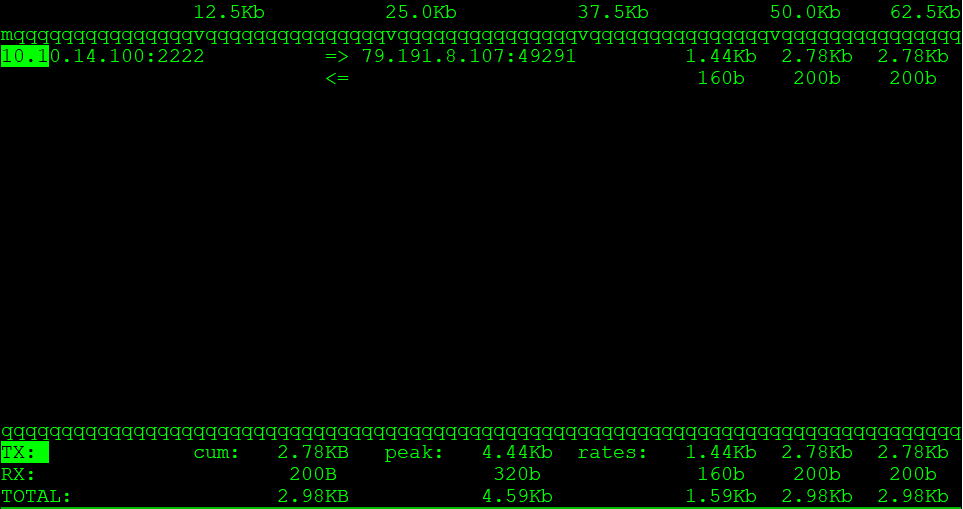
To start monitoring network traffic, run iftop with parameters: ‘-PpNn’:
iftop parameters -PpNn
Shell
1
# iftop -PpNn
As I am ssh connected to the remote machine, I can see my network connection.
Now let’s go back to the local machine, create a large file:
1GB file creating
Shell
1
# truncate -s 1G 1G-file.txt
Once we have created a 1GB file, let’s try to send it with a transfer limit to the remote machine:
sending a file with a limit
Shell
1
# scp -l 800 -P2222 1G-file.txt soban@soban.pl:~
In this case, I used scp with the limit of 800 to send the file. To calculate how many KB/sec this is, divide by 8. From a simple calculation it follows that 800/8 = 100. To see scp and how to send files I encourage you to read: Securely Copy Files (scp) tool to copying files by ssh.
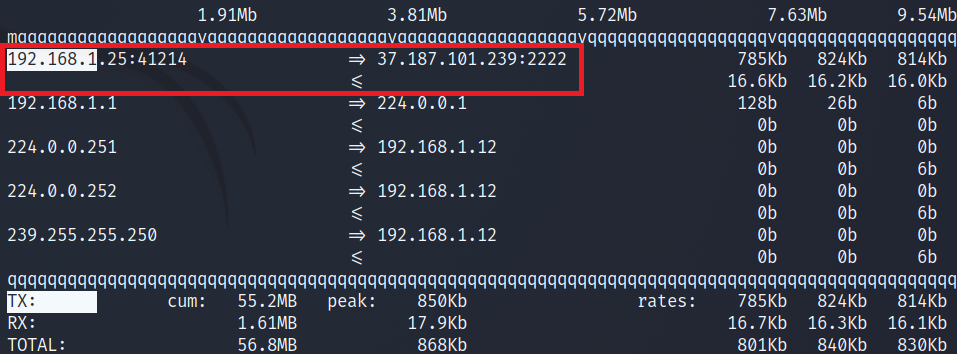
When sending the file, the traffic on the local machine looked like this (outgoing traffic):
iftop on local machine
Shell
1
# iftop -PpNn
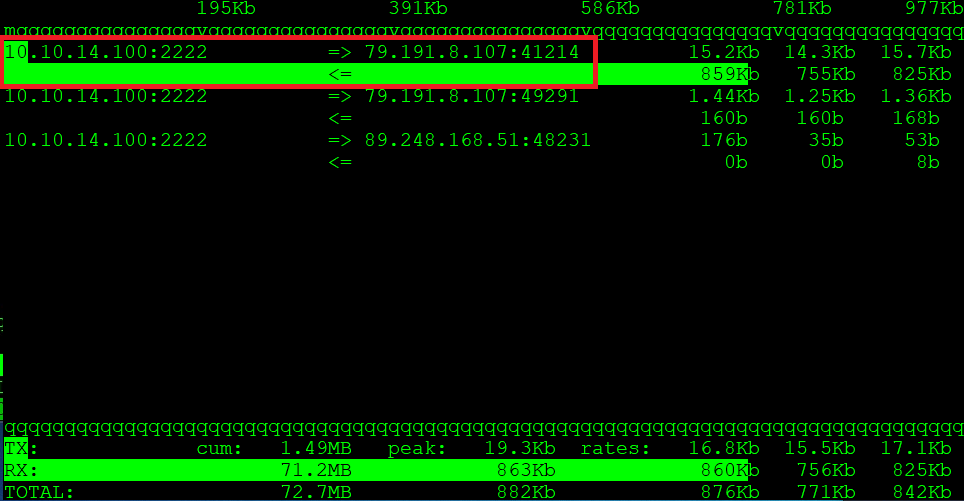
At the same time, it looked like this on the remote machine (incoming traffic):
iftop on remote machine
Shell
1
# iftop -PpNn
As you can see, in this way you can catch both outgoing and incoming traffic. The iftop tool has more parameters, I encourage you to read the manual. It is a simple tool, however, thanks to it, we can easily observe live network traffic. In the case of bruteforce, a significant number of connections will be made, but in the case of a DoS attack, the attacker will try to saturate the bandwidth, therefore the incoming traffic on the machine will be large. There are situations when the machine is naturally overloaded with the network, then you should limit the connection speed, in this case iptables works perfectly.
A very good tool for securely copying files via the ssh protocol between machines is scp. It allows you to transfer files to the target machine as well as download from a given source. The tool is usually built into the system so it works on many distributions. Below I will present how you can send and download files. For correct file transfer, running ssh service is required, because it is the basis of scp operation. Of course, when using the tool, you can specify the port as the parameter, provided that it has been changed. The standard port used by the ssh daemon is 22.
In Linux, scp (Secure Copy) is a command-line utility used for securely transferring files between local and remote systems. It is a secure alternative to cp, which is not secure when transferring files over a network.
The scp command is commonly used for copying files to or from a remote server. It uses the SSH protocol to securely transfer files and provides the same level of security as SSH. The syntax of the scp command is as follows:
Shell
1
scp[options][source][destination]
Here, [source] is the file or directory you want to copy, and [destination] is the location where you want to copy the file or directory.
Some common options used with the scp command are:
-r: Copies directories recursively
-P: Specifies the port number to use for the SSH connection
-i: Specifies the path to the identity file used for authentication
For example, to copy a file named file.txt from a remote server to the local machine, you would use the following command:
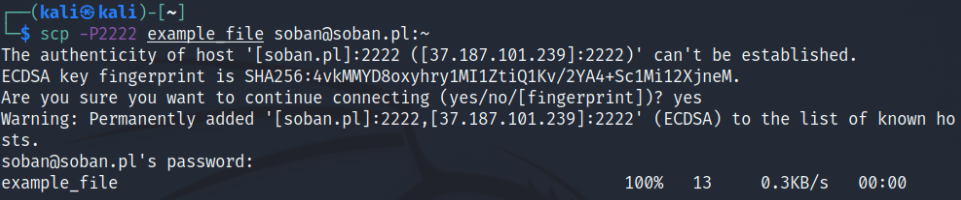
There are many combinations, you can send, for example, all files containing the ending (*.tar.gz) to the user’s home directory, which is just symbolized by ‘~‘:
send all *.tar.gz file to remote machine
Shell
1
$scp-P2222*.tar.gzsoban@soban.pl:~
An interesting parameter is the ‘-r‘ in scp where we can transfer entire folders, example using copying a folder from local machine to remote machine:
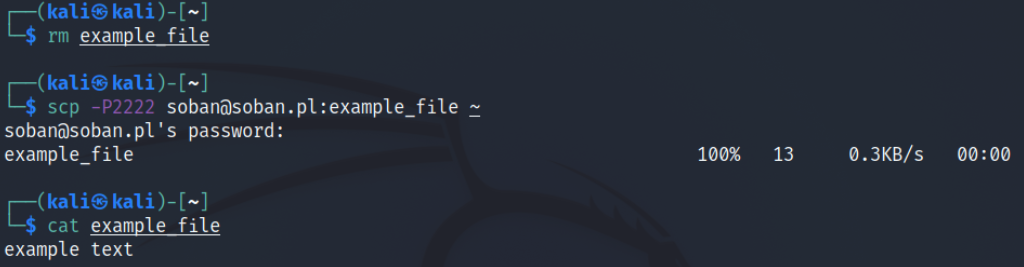
OK, after the file has been successfully sent to the target machine, let’s delete the local file we created above and try to download it back:
just remove example_file
Shell
1
$rmexample_file
Next, let’s move on to downloading the file from the remote server to the local machine:
Download file from remote machine
Shell
1
$scp-P2222 soban@soban.pl:example_file~
Above I gave an example of how to send an entire folder from a local machine to a remote machine. The other way around, of course, we can also do it. To download a remote folder to a local machine, use the ‘-r‘ parameter:
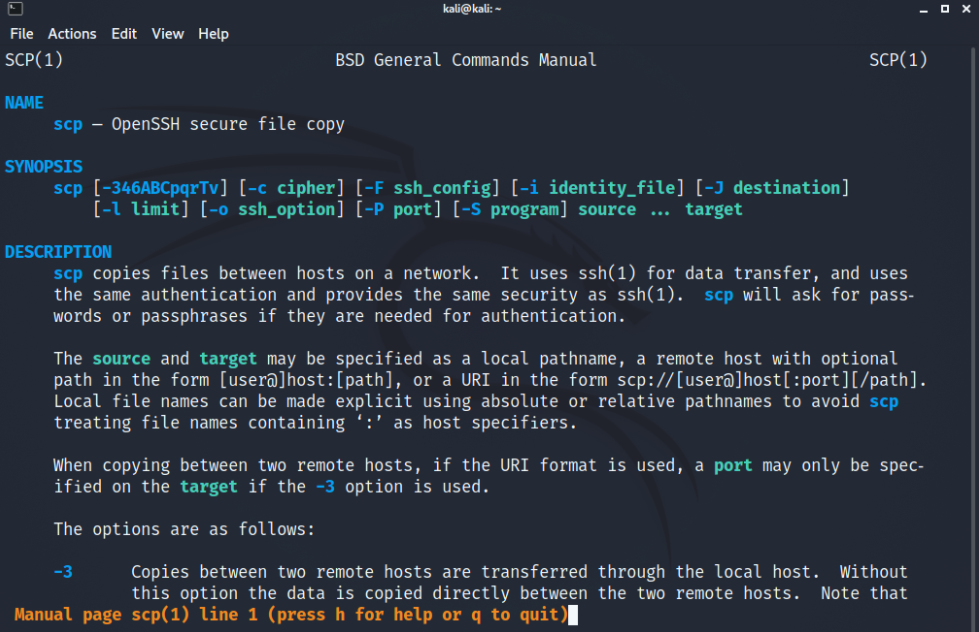
The scp utility has more parameters, you can get them by reading the man page:
To read manual scp
Shell
1
$manscp
It is worth paying attention to the ‘-l‘ parameter where we can set the limit of transferred files. This is useful when transferring larger files so as not to overload your connection.
If you are tired of constantly entering your password, I encourage you to read how you can connect to ssh without providing a password. Then copying files using scp will become more: generate ssh key pair in linux.
In my opinion, scp is good for transferring files quickly one time. However, as often you exchange files between machines a more convenient way is to use sshfs as described here: sshfs great tool to mount remote file system.
SSHFS (SSH File System) is a secure file transfer system that enables users to remotely access and manage files on a remote server over an encrypted SSH (Secure Shell) connection. SSHFS uses the SSH protocol to establish a secure connection between the local and remote systems, which enables users to securely transfer files between the two systems.
To use SSHFS, the user needs to have SSHFS installed on their local system as well as the remote system that they want to connect to. Once SSHFS is installed, the user can mount the remote system as a local directory on their system, and access the remote files as if they were stored locally.
SSHFS provides a secure and convenient way to access and manage files on remote systems, without the need for additional software or complicated configuration. It also enables users to access files on remote systems using standard file operations, such as copying, moving, and deleting, making it a simple and effective way to manage files on remote systems.
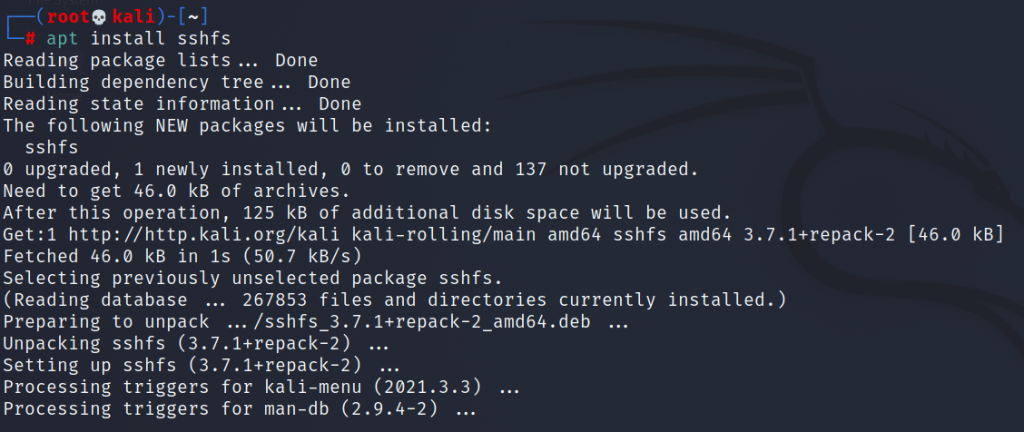
SSH Filesystem (sshfs) is a very useful tool for remotely transferring files over the ssh protocol. An additional advantage of the whole is encryption. This is a convenient way to mount a remote folder to delete files. Below I will try to briefly introduce how to install sshfs and how to mount the folder remotely. Additionally, we will make an entry in /etc/fstab at the end, so that the resource itself is mounted after restarting the system. Let’s move on to installing the tool itself:
Shell
1
# apt install sshfs
In this case, as you can see, the installation was done on kali linuxe, however the procedure is the same on debian.
Let’s move on to the file mounting itself, at this point I will point out that the default port is 22. In my case, however, the port has been changed to 2222. For services such as ssh, I try to change the default ports so as not to get caught by bots and not end up in the database such as shodan.io. The command itself in this case is very simple, but first we need to create a folder:
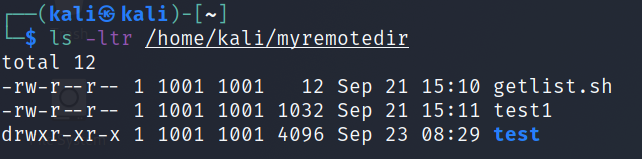
During mounting, we will be asked if the fingerprint is correct. Then for the system password. The command itself can be disassembled into ‘soban‘ – this is the username. Then ‘soban.pl‘ is the domain name, you can also put the IP address here. The next ‘/home/soban‘ element is the folder that will be mounted. And after the space ‘/home/kali/myremotedir‘ we give the folder where the remote folder should be mounted. If everything went as planned, we can list ‘/home/kali/myremotedir‘ and it should list the contents of the remotely mounted folder ‘/home/soban‘. Let’s list the contents of the ‘/home/kali/myremotedir‘ folder:
list remote mounted dir
Shell
1
$ls-ltr/home/kali/myremotedir
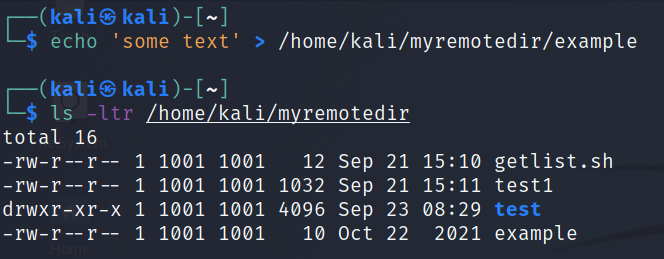
Let’s create a remote file:
create file on remote mounted dir
Shell
1
2
$echo'some text'>/home/kali/myremotedir/example
$ls-ltr/home/kali/myremotedir
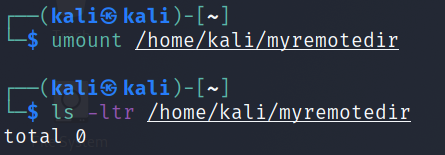
Now let’s unmount the remote folder and try listing it again:
umount remote dir
Shell
1
2
$umount/home/kali/myremotedir
$ls-ltr/home/kali/myremotedir
As expected, the folder is empty and the file we created was created on a remotely mounted drive. After unmounting as you can see the file ‘/home/kali/myremotedir/example‘.
The next step is to create a private key to mount the folder without entering a password. It is very important not to send nikmou your private key. How we can generate and add a public key to a remote server can be read here: “Generate SSH key pair in Linux“.
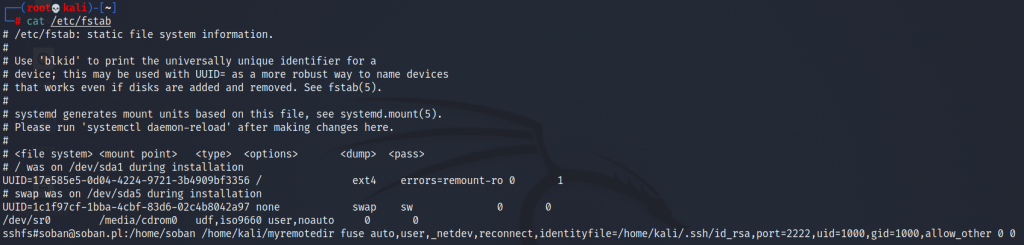
Now we will try to add an entry to /etc/fstab which will allow automatic mounting on startup of the remote folder system. To do this, edit the /etc/fstab entry and add this entry:
It is important that all data is correct, in order to verify the parameters, you can use the command for this ‘id‘:
check id kali
Shell
1
# id kali
Now we can move on to mounting the resource:
mount remote dir
Shell
1
# mount /home/kali/myremotedir
When mounting for the first time, we may be asked to accept and confirm that the fingerprint is correct. After verifying the correctness of mounting the remote resource, we can restart the system. One note here, the system may get up longer.
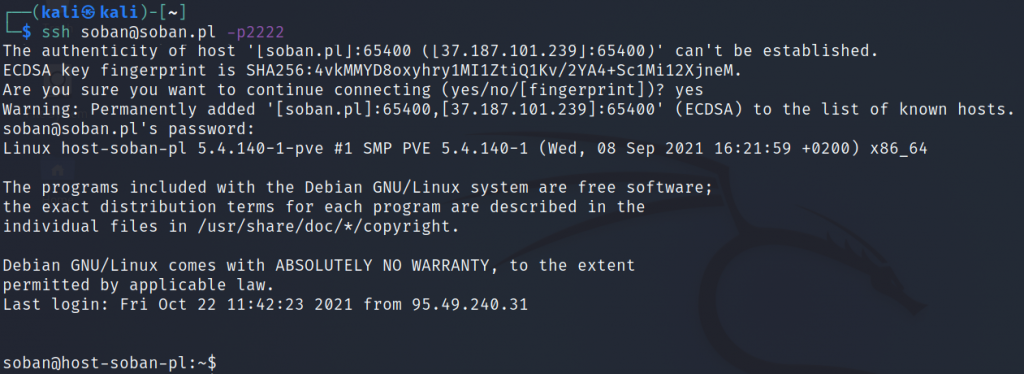
A very convenient way to log into remote systems via ssh is without the use of passwords. Here it is very important not to share your private key with anyone. Currently, when trying to connect, I am asked for the password to the server:
ssh connection to remote host
Shell
1
$ssh soban@soban.pl-p2222
During the connection, we will be asked if the fingerprint is correct. Then enter the user password that is set on the remote server. During the ssh command ‘soban@soban.pl -p2222‘ I gave the username ‘soban‘ then the domain ‘soban.pl‘ and ‘-p2222‘ port ‘2222’. The default port after ssh is 22, but in this case I changed it so that it does not come out on scans – this increases security as often bots / hackers look for port 22, which is the default ssh port set.
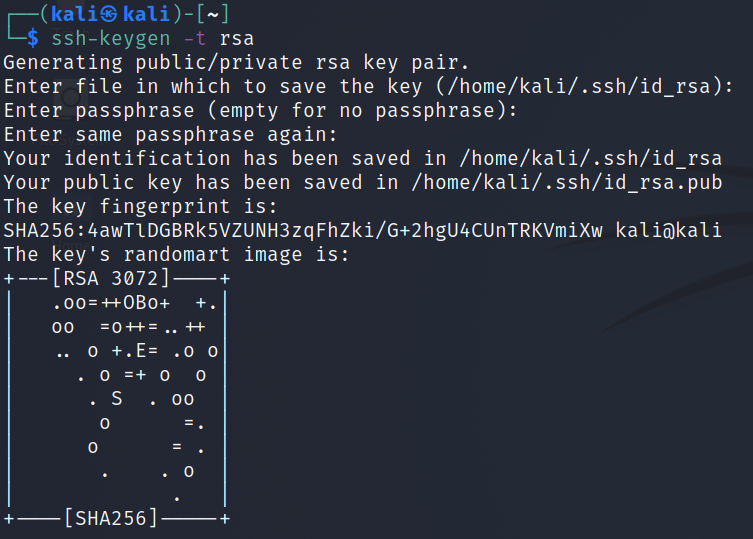
Let’s move on to generating the key and copying it to the server:
Shell
1
$ssh-keygen-trsa
This is how the key generation looks like, I hit enter for each question:
As a result, a private key was generated: (/home/kali/.ssh/id_rsa) and a public key (/home/kali/.ssh/id_rsa) that we will place on the remote server:
The last time we log in to the server by entering the password. When logging in, we will not be asked for a password now. This way we are able to add our public key (.ssh / authorized_keys) to the remote server.