Improving encryption on old red hat 5 by new Oracle Linux 7 using apache mod_proxy

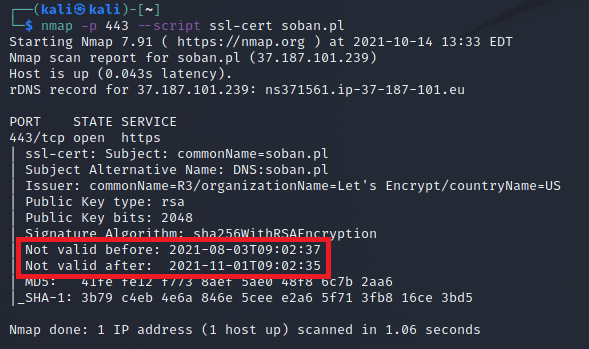
There are situations when we need to increase the encryption level on the old system – according to the PCI audit requirements. However, the old system is no longer supported, so updating the encryption level is not possible. This is not a recommended solution, because we should try to transfer the application to a new system. After all, when we have little time, it is possible to hide the old version of the system and allow only the new machine to move to it. In this particular example, we will use mod_proxy as a proxy to redirect traffic to the old machine, while using iptables we will only allow communication with the new machine. It is not a recommended solution, but it works and I would like to present it here. The systems that I will be basing on in this example are the old red hat 5 and the new oracle linux 7. Recently, it has become very important to use a minimum of tls 1.2 and none below for banking transactions. Let’s start with the proxy server configuration oracle linux 7.

As of this writing, the addressing is as follows:
new_machine IP: 10.10.14.100
old_machine IP: 10.10.14.101
Traffic will be routed on port 443 from new_machine to old_machine.

Before we go to proxy configuration, please make sure there are network transitions from new_machine (10.10.14.100) to old_machine (10.10.14.101) to port 443. You can read how to verify network connections here: check network connection and open tcp port via netcat.

We go to the installation of apache and mod_proxy:

After installing apache, go to the edition:

Below are the news on the check level, what are the updates, and ip on the next service update:

In order to verify the correctness of apache configuration, you can issue a command that will check it:

If the apache configuration is correct, we can proceed to reloading apache:

At this point, we have a configured proxy connection. Before we move on to limiting traffic with iptables, I suggest you go to the site – with the new mod_proxy configured and test if everything is working properly and if there are any problems with the application.

Once everything is working fine, the network transitions are there, we can go to the iptables configuration for red hat 5. Let’s start by checking the system version:

Now we are going to prepare iptables so that the network traffic is available on port 443 from the new_machine (10.10.14.100). To do this, edit the file /etc/sysconfig/iptables:

After iptables settings are correct, we can reload the service:

In this way, we managed to cover up the weak encryption by proxying and diverting traffic to the new machine. This is not a recommended solution and you should try to transfer the application to a new environment compatible with the new system. However, in crisis situations, we can use this solution. Network traffic is not allowed by other IP addresses, so scanners will not be able to detect weak encryption on the old machine, and users using the old environment will not be able to use it. This does not change the fact that weak encryption is still set in the old environment and needs to be corrected. The example I gave is for the old red hat 5 and the new oracle linux 7, but it can be assumed that a similar solution and configuration is possible for other versions of the system.

Checking SSL certyfikat date using nmap and curl

This time I will use Kali Linux it is a great distro for pentesters. After all, nothing prevents you from using another distribution, such as Debian Linux.

Sometimes we need to check the certificate issuance date. Nmap and curl are a very good tool for this.
Both of these tools allow for advanced analysis of the SSL connection. Let’s try to check the certificate date with nmap:

To be more precise, let’s leave the date and time alone:

Here is the result:

In my experience nmap is a very good tool – however curl is much faster, to use it, do the following:

$ curl -X GET -i 'https://google.com' | grep -i 'date:' | grep GMT

This is the effect:

It is worth getting acquainted with both tools. Besides checking the date of the certificate, they offer a number of other possibilities.

nmap scaning ciphers and ssl

Nmap – scanning SSL/TLS ciphers on Debian 11

In this example we are working on Debian 11 (Bullseye). First, let’s confirm the system version:

Nmap is one of the most powerful network scanning tools available on Linux. It allows you to scan open ports, detect running services, identify software versions and analyze supported SSL/TLS protocols and cipher suites.

Installation on Debian 11 is simple:

After installation, we can test a remote HTTPS server. For example:

The -sV option enables service version detection and --script ssl-enum-ciphers checks supported TLS versions and encryption ciphers. This allows you to verify which TLS versions are enabled (TLS 1.0, 1.1, 1.2, 1.3), whether weak ciphers like 3DES are supported and if potential cryptographic vulnerabilities exist.

Nmap is slower than tools like sslscan, but the level of detail is very good and useful especially for internal infrastructure testing.

TLS 1.0:

TLS 1.0 scan result using Nmap

TLS 1.1:

TLS 1.1 scan result using Nmap

TLS 1.2:

TLS 1.2 cipher suites detected by Nmap

The most important thing when analyzing SSL/TLS configuration is checking for weak or vulnerable ciphers. For example, if you see: “64-bit block cipher 3DES vulnerable to SWEET32 attack”, it means the server still supports 3DES, which is vulnerable to the SWEET32 attack. In production environments such ciphers should be disabled.

If you are testing a public website, you can also use https://www.ssllabs.com/ssltest/. However, for internal servers, staging environments or private infrastructure, using Nmap directly from your Debian system is often the best solution. Regular SSL/TLS scanning helps keep your infrastructure secure and ensures that outdated protocols and weak encryption methods are eliminated.

sslscan tool for scaning SSL

SSLScan is a command-line tool used for SSL/TLS vulnerability scanning. It is used to detect SSL/TLS vulnerabilities and weaknesses on servers that use SSL/TLS. SSLScan supports all SSL and TLS protocols and cipher suites, including new ones such as TLS 1.3.

SSLScan can be used to identify various SSL/TLS vulnerabilities, such as weak ciphers and encryption algorithms, insecure renegotiation, and Heartbleed attacks. It can also identify unsupported SSL/TLS versions and protocols, as well as expired or self-signed certificates.

SSLScan works by connecting to the target server and sending a series of SSL/TLS handshake messages to determine the supported protocols and cipher suites. It then checks for vulnerabilities and weaknesses by trying various attacks against the server, such as malformed SSL/TLS packets and invalid certificates.

SSLScan can be run from the command line and supports various options and flags to customize the scan. For example, it can be used to scan a specific port, specify the SSL/TLS version, or use a specific cipher suite.

Overall, SSLScan is a useful tool for checking SSL/TLS vulnerabilities and ensuring that servers are secure. It is commonly used by security professionals and system administrators to identify and mitigate SSL/TLS vulnerabilities on their networks.

In debian 11:

One of the best tool for scaning ssl is sslscan in Linux.
You can install on debian like this as root of course:

and than we can check for example google.com:

As you see, google use now tls 1.0, 1.1, 1.2 and 1.3: