If you run a Linux server with Nginx, SSH, or WordPress, you probably already know Fail2Ban. It is a solid tool, but it works locally — it blocks only the IP addresses that attacked your server.
CrowdSec works in a completely different way. It is a protection system based on shared IP reputation. If thousands of servers worldwide detect a malicious IP address, your server can block it before an attack even happens.
How Does CrowdSec Work?
analyzes system logs (nginx, ssh, wordpress)
detects suspicious behavior
shares attacker IP intelligence with other servers
blocks traffic at the firewall level
The result? Most bots and internet scanners never even reach your Nginx server.
Installing CrowdSec on Debian / Ubuntu
CrowdSec installation is very simple and available directly from Debian repositories.
Install CrowdSec
Shell
1
2
apt update
apt install crowdsec
During installation, CrowdSec automatically:
creates a local API (LAPI)
registers the server in CrowdSec Central API
downloads default security scenarios
Installing Firewall Bouncer
CrowdSec detects threats, but it requires an enforcement component — called a bouncer — which blocks traffic at the firewall level.
Install firewall bouncer
Shell
1
apt install crowdsec-firewall-bouncer
By default, the bouncer uses nftables and automatically adds blocking rules for malicious IP addresses.
Installing Security Collections
Collections include log parsers and attack detection scenarios.
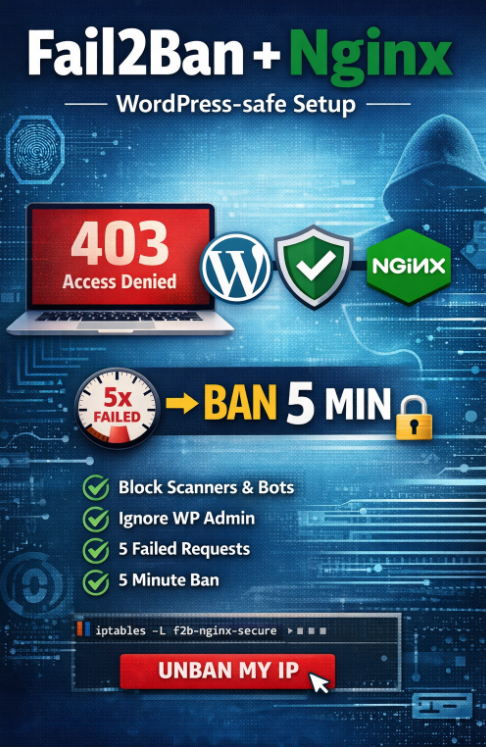
This guide shows a complete Fail2Ban installation and configuration for Nginx, designed to:
block real scanners and exploit attempts (e.g. requests to /.env, /.git, /phpmyadmin, etc.),
avoid blocking administrators by accident (common issue when banning only by HTTP errors),
ban IP addresses after repeated suspicious activity,
use a short ban time (5 minutes) to reduce the risk of locking yourself out.
Why banning by HTTP errors alone can backfire
Many guides suggest banning by HTTP status codes (4xx/499) only. In real life this often causes self-bans, because modern apps generate bursts of requests (AJAX, admin panels, cache rebuilds), and you can hit error statuses during normal work.
This setup uses a safer approach:
exploit paths are always suspicious,
HTTP errors are counted only when the request has no Referer (typical for scanners),
Upgrading Debian from version 12 (bookworm) to 13 (trixie) is an operation that should be performed in a repeatable and predictable way, especially on servers and containers (for example Proxmox LXC or virtual machines). Below you will find a simple guide and ready-to-use commands to download and run the upgrade script.
Before running the upgrade: create a backup or snapshot. In Proxmox, the best option is vzdump or a snapshot. On bare metal, at minimum back up /etc, applications, and databases.
Proxmox LXC / VM: backup using vzdump or create a snapshot.
Server: backup /etc, /var/www, databases (MySQL/PostgreSQL), and SSL certificates.
Before running the upgrade, display available parameters and usage examples:
Show help
Shell
1
2
cd/root
./upgrade_to_debian13.sh--help
4) Upgrade Debian 12 → Debian 13 (system only)
If you are currently running Debian 12 (bookworm) and want to perform a system upgrade:
System upgrade
Shell
1
2
cd/root
./upgrade_to_debian13.sh
The script will create a backup of /etc/apt/sources.list, switch repositories to trixie, run apt update and apt full-upgrade, and finally execute autoremove and autoclean.
5) Auto-detect PHP/nginx and update if needed
If the container or VM is running a web stack and you want the script to automatically detect PHP usage (nginx + fastcgi_pass) and upgrade PHP and nginx if necessary:
Auto mode
Shell
1
2
cd/root
./upgrade_to_debian13.sh--auto
6) Force PHP and nginx upgrade (PHP-FPM socket fix)
If you want to force installation or upgrade of PHP and automatically fix nginx configuration to use the correct PHP-FPM socket:
This command installs PHP 8.2 (php-fpm and common modules) and replaces old PHP-FPM socket paths in nginx configuration with /run/php/php8.2-fpm.sock. Then it runs nginx -t and reloads or restarts services.
7) Already running Debian 13? PHP/nginx only mode
If the system is already running Debian 13 (trixie) and you only want to upgrade PHP and nginx without modifying system repositories:
If you want to see what the script will do without making any changes:
Dry run
Shell
1
2
cd/root
./upgrade_to_debian13.sh--auto--dry-run
9) Troubleshooting: wget installed but not working
If apt reports wget is installed but the shell shows command not found, it is usually a PATH issue. The easiest workaround is to use the full path: /usr/bin/wget.
Debug wget/PATH
Shell
1
2
3
4
echo"$PATH"
command-vwget||true
ls-l/usr/bin/wget||true
/usr/bin/wget--version||true
Summary
This solution provides a convenient way to upgrade Debian 12 → Debian 13 and optionally fix common PHP/nginx issues after upgrade (PHP-FPM socket paths, nginx config testing, and service restart). Always create a backup before upgrading and start by running --help to review available options.
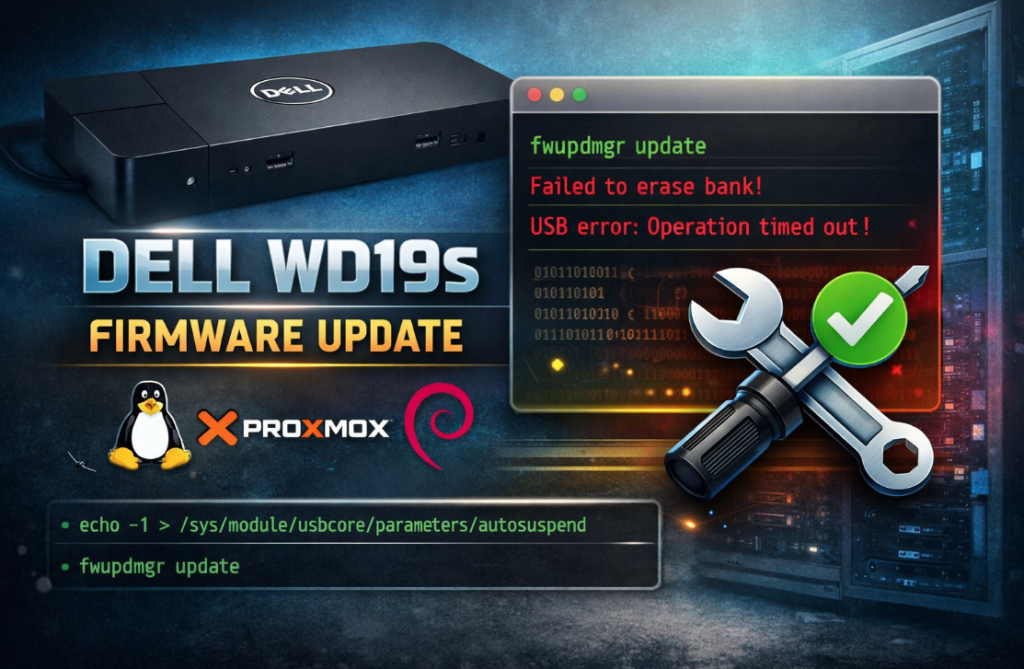
If you’re trying to update the firmware of a Dell WD19/WD19S docking station on Proxmox (or Debian) using fwupdmgr, you may hit the classic Operation timed out error during the Erasing… stage. In practice, the update fails due to USB power management (autosuspend). Below you’ll find a simple, effective fix and a ready-to-run script you can use on a server or laptop.
Symptoms
Most commonly, during a dock firmware update (WD19/WD19S), you’ll see an error similar to:
At this point, fwupdmgr may show the WD19S device as Update State: Failed or keep reporting pending activation, but the flash process never completes.
Why does this happen?
During flashing, the dock performs long-running operations. If the system tries to save power on USB (autosuspend), control transfers can fail. The result is a timeout exactly during the flash bank erase stage (erase bank).
Quick fix: disable USB autosuspend during the update
The simplest solution is to temporarily set autosuspend to -1 (disabled). This setting lasts until reboot (unless you make it permanent in the kernel cmdline), but it’s more than enough for the update process.
Disable USB autosuspend (temporary)
Shell
1
echo-1>/sys/module/usbcore/parameters/autosuspend
Then run the firmware update:
Run update
Shell
1
2
fwupdmgr refresh--force
fwupdmgr update
After the update: “pending activation” and unplug requirement
After a successful firmware installation for WD19/WD19S, fwupdmgr often prints the following message:
Dock requires unplug
Shell
1
2
The update will continuewhen the device USB cable has been unplugged.
WD19S ispending activation;usefwupdmgr activate tocomplete the update.
Do the following in this exact order:
Unplug the USB-C cable from the dock (from the laptop).
(Optional) Unplug the dock power for 10–15 seconds and plug it back in.
# Disable autosuspend to prevent USB timeout during dock firmware erase/write
if[[-f"$AUTOSUSPEND_PATH"]];then
echo"[INFO] Disabling USB autosuspend (set to -1) to avoid dock update timeouts..."
echo-1>"$AUTOSUSPEND_PATH"
fi
read-p"Do you want to update the entire device? (y/n): "answer
if[["$answer"=="y"||"$answer"=="Y"]];then
echo"[INFO] Running fwupdmgr update..."
fwupdmgr update||{
echo"[ERROR] fwupdmgr update failed."
echo"[HINT] If this is Dell dock (WD19/WD19S), try: unplug USB-C, replug, then run: fwupdmgr activate"
exit1
}
echo"[INFO] Update finished."
echo"[INFO] If you updated a Dell dock and it says 'pending activation':"
echo" 1) Unplug USB-C cable from the dock"
echo" 2) (Optional) Unplug dock power for 10 seconds, plug back"
echo" 3) Run: fwupdmgr activate"
else
echo"[INFO] Skipping firmware update."
fi
echo"[INFO] Done."
Running the script
The simplest way:
Run script
Shell
1
2
chmod+xdell_updage.sh
./dell_updage.sh
FAQ & tips
The update still fails? Disconnect all peripherals from the dock (monitors/LAN/USB), leave only power and USB-C, do a hard reset of the dock (unplug power for 30s), and try again.
“pending activation” after update – this is normal for WD19/WD19S. You must unplug USB-C, plug it back in, then run fwupdmgr activate.
Does this update the laptop BIOS? Not always. fwupdmgr shows “System Firmware” (BIOS/UEFI) separately from the dock. This article focuses on the dock and the USB timeout issue.
Summary
If Dell WD19/WD19S firmware updates fail on Proxmox/Debian during the Erasing… stage, in most cases it’s enough to disable USB autosuspend temporarily. The script above does that automatically and restores the previous setting afterwards, so your system keeps working normally.
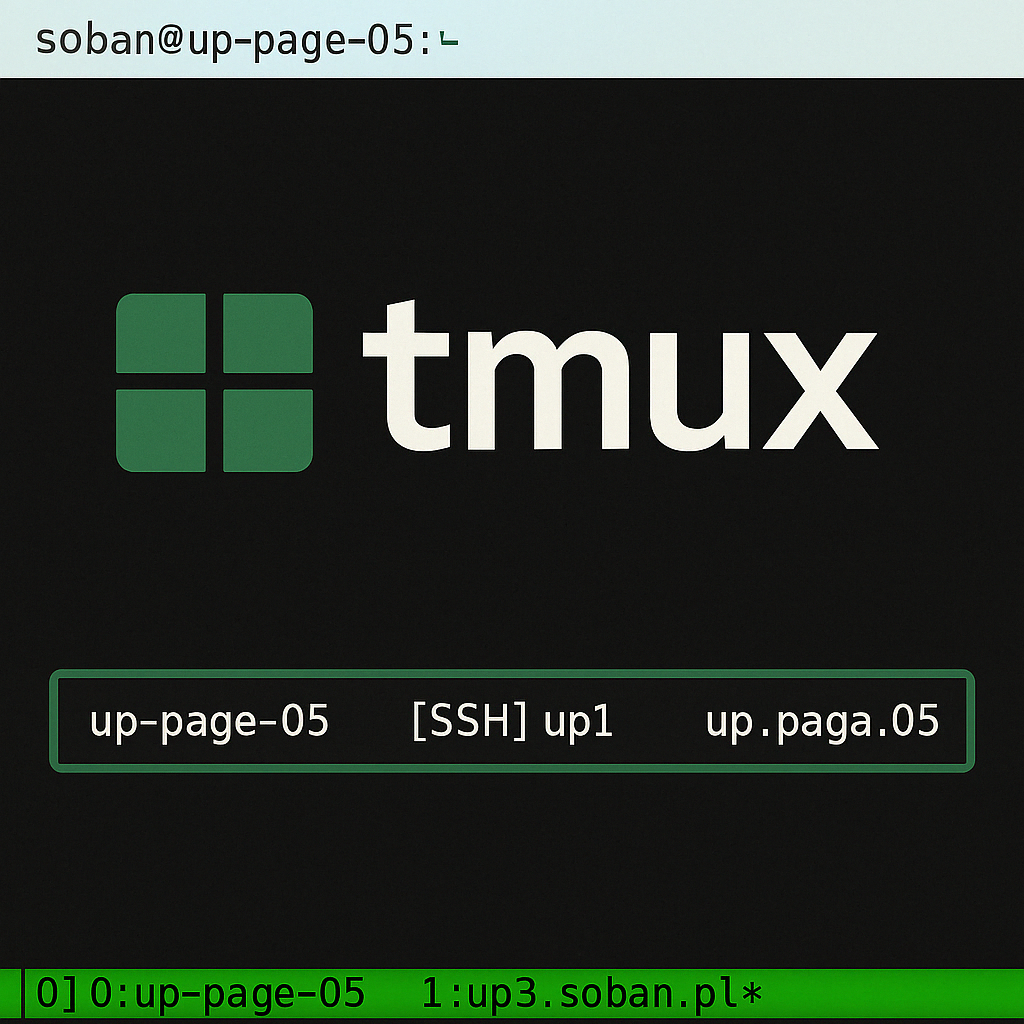
Want your Tmux window titles to automatically show the hostname you connect to via SSH — and restore the local name after you disconnect? This guide will walk you through setting that up step by step.
1. Tmux configuration – ~/.tmux.conf
In your Tmux configuration file, set the default shell command to a custom Bash init file (.bash_tmux) that will handle window title updates.
This file runs at shell startup inside Tmux. It sets the window name to your local hostname and overrides the ssh command to change the window title dynamically.
.bash_tmux
Shell
1
2
3
4
5
6
7
8
9
10
11
12
13
14
15
16
17
18
19
20
21
22
23
24
25
26
27
28
29
30
31
32
33
34
35
36
37
38
39
40
41
42
43
44
45
46
#!/bin/bash
# ~/.bash_tmux
# Custom Bash init file for Tmux sessions with dynamic tab naming
# Override the default ssh command to dynamically rename the Tmux window
ssh(){
if[-n"$TMUX"];then
# Loop through arguments to find the target host (first non-flag argument)
forarg in"$@";do
if[["$arg"!=-*]];then
if[["$arg"==*@*]];then
host="${arg#*@}"# extract host from user@host
else
host="$arg"
fi
break
fi
done
# Strip any trailing junk or whitespace
host="$(echo "$host" | cut -d' ' -f1)"
# Rename the Tmux window to the SSH target
[-n"$host"]&&tmux rename-window"$host"
# Save the local hostname to restore later
local_host="$(hostname -s)"
# Run the actual SSH command
commandssh"$@"
# Restore the original window name after logout
tmux rename-window"$local_host"
else
# Not in Tmux — just run ssh normally
commandssh"$@"
fi
}
# Load the user's regular bash configuration
source~/.bashrc
# On shell start, if in Tmux, set the window name to the current hostname
if[-n"$TMUX"];then
tmux rename-window"$(hostname -s)"
fi
3. Reload Tmux config without restarting
To apply the changes without restarting the Tmux session, run the following:
Reload tmux config
Shell
1
tmux source-file~/.tmux.conf
To manually reload the current shell with the new .bash_tmux configuration:
Reload shell
Shell
1
exec bash--rcfile~/.bash_tmux
4. Final result
New Tmux windows automatically show the local hostname
When connecting via SSH, the window is renamed to the remote host
When disconnecting, the original local name is restored
Clean, readable, and perfect for sysadmins, devops engineers, and Tmux lovers who appreciate automatic order in their terminal tabs 💪
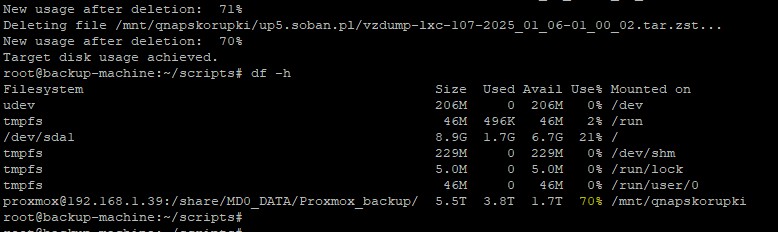
Automation of Disk Space Management in a Linux Environment
In today’s digital world, where data is being accumulated in ever-increasing amounts, managing disk space has become a key aspect of maintaining operational efficiency in systems. In this article, I will present a script that automates the process of managing space on a remote disk mounted via SSHFS, particularly useful for system administrators who regularly deal with filling storage media.
Prerequisites
Before starting, ensure that SSHFS and all necessary packages enabling its proper operation are installed on your system. SSHFS allows remote file systems to be mounted via SSH, which is crucial for our script’s operation. To install SSHFS and the necessary tools, including a package that enables password forwarding (sshpass), use the following command:
Installing SSHFS and sshpass
Shell
1
2
apt-getupdate
apt-getinstall sshfs fuse sshpass-y
Bash Script for Disk Space Management
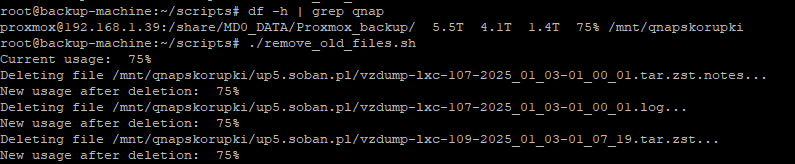
Our Bash script focuses on monitoring and maintaining a defined percentage of free disk space on a remote disk mounted via SSHFS. Here are the script’s main functions:
Goal Definition:
TARGET_USAGE=70 – the percentage of disk space we want to maintain as occupied. The script will work to keep at least 30% of the disk space free.
Mount Point and Paths:
MOUNT_POINT=”/mnt/qnapskorupki” – the local directory where the remote disk is mounted. TARGET_DIRS=”$MOUNT_POINT/up*.soban.pl” – the directories where the script will look for files to delete if needed.
Function check_qnap: This function checks whether the disk is mounted and whether the mount directory is not empty. If there are issues, the script attempts to unmount and remount the disk using sshfs with a password forwarded through sshpass.
File Deletion: The script monitors disk usage and, if TARGET_USAGE is exceeded, it finds and deletes the oldest files in specified directories until the target level of free space is achieved.
Full Bash Script
Shell
1
2
3
4
5
6
7
8
9
10
11
12
13
14
15
16
17
18
19
20
21
22
23
24
25
26
27
28
29
30
31
32
33
34
35
36
37
38
39
40
41
42
43
44
45
46
47
48
49
50
51
52
53
54
55
56
57
58
59
60
61
62
63
64
65
66
67
#!/bin/bash
TARGET_USAGE=70
MOUNT_POINT="/mnt/qnapskorupki"
TARGET_DIRS="$MOUNT_POINT/up*.soban.pl"
# Function to check and mount SSHFS
functioncheck_qnap{
local remote_path="/share/MD0_DATA/backup_proxmox/"
local user_remote="remote_user"
local remote_host="192.168.1.XX"
local port=22
local password='XXXXXXXXXXXXXXXXXXXXXXX'
# Check if the mounting directory exists and is empty
if[!-d"$MOUNT_POINT"]||[-z"$(ls -A $MOUNT_POINT)"];then
echo"Problem: The directory $MOUNT_POINT is missing or empty. Attempting to remount..."
# Unmount if anything is currently mounted
ifmountpoint-q$MOUNT_POINT;then
echo"Unmounting $MOUNT_POINT..."
fusermount-u$MOUNT_POINT
sleep5
fi
# Remount
echo"Mounting SSHFS: $user_remote@$remote_host:$remote_path to $MOUNT_POINT..."
The script uses a password directly in the command line, which can pose a security risk. In practical applications, it is recommended to use more advanced authentication methods, such as SSH keys, which are more secure and do not require a plaintext password in the script. However, in the case of QNAP, we used a password when writing this script.
Conclusion
The presented script is an example of how daily administrative tasks, such as disk space management, can be automated, thus increasing efficiency and reliability. Its implementation in real IT environments can significantly streamline data management processes, especially in situations where quick response to changes in disk usage is critical.
Expanding disk space in Linux virtual machines is a key aspect of server system management. In this article, we show how to effectively increase disk space using LVM and fdisk tools, based on real system data.
Preliminary Preparations
Before making changes to partitions and volumes, it is important to check the current state of the disks in the system. We will use the lsblk command to identify available disks and partitions.
Shell
1
lsblk
Here is an example of the lsblk command output on a machine:
Shell
1
2
3
4
5
6
7
8
9
10
11
12
NAME MAJ:MIN RMSIZE RO TYPEMOUNTPOINT
loop07:0055.7M1loop/snap/core18/2829
sda8:0042G0disk
├─sda18:10512M0part/boot/efi
├─sda28:201G0part/boot
└─sda38:3040.5G0part
└─ubuntu--vg-ubuntu--lv253:0078.5G0lvm/
sdb8:160350G0disk
└─sdb18:17060G0part
└─ubuntu--vg-ubuntu--lv253:0078.5G0lvm/
sr011:011024M0rom
Creating Snapshots
Before making changes to disk configurations, it is advisable to create a snapshot of the LVM volumes to ensure data can be restored in case of unexpected issues.
Next, we proceed to modify the partitions using fdisk. We remove the existing partition and then create a new one that utilizes the entire available space on disk sdb.
Shell
1
fdisk/dev/sdb
Saving Changes
After properly configuring the partitions, we use the w command in fdisk to save the changes and update the partition table.
Shell
1
Command(mforhelp):w
Executing pvscan
After modifying the partitions, we execute the pvscan command so the system can update information about available physical volumes.
Shell
1
pvscan
Configuring LVM
After saving changes to the partition table, we need to update the LVM configuration to include the new disk space. We use the lvextend command with automatic file system resizing.
Shell
1
lvextend-l+100%FREE/dev/ubuntu-vg/ubuntu-lv-r
Summary
Expanding disk space on a Linux virtual machine enhances performance and the availability of storage space. Thanks to the steps described, managing disk space in systems using LVM becomes simpler and more efficient.
In today’s world, where data is becoming increasingly valuable, proper backup management is crucial for the security of information systems. In this article, I present an effective way to automate the backup of key configuration files in Proxmox-based systems using a simple bash script and Crontab configuration.
Bash Script for Backup of the /etc Directory
The /etc file contains critical system configuration files that are essential for the proper functioning of the operating system and various applications. Loss or damage to these files can lead to serious problems. Below, I present an effective script, backup-etc.sh, that allows for the automated backup of this directory:
Generates the current date and time, which are added to the name of the archive to easily identify individual copies.
Uses the tar program with zstd compression to create an archived and compressed copy of the /etc directory.
Removes archives older than 100 days from the /var/lib/vz/dump/ location, thus ensuring optimal disk space management.
Adding Script to Crontab
To automate the backup process, the script should be added to crontab. Below is a sample configuration that runs the script daily at 2:40 AM:
Editing crontab
Shell
1
2
# crontab -e
402***/root/backup-etc.sh>/dev/null2>&1
Redirecting output to /dev/null ensures that operations are performed quietly without generating additional output to standard output.
Download the Script from soban.pl
The backup-etc.sh script is also available for download from the soban.pl website. You can download it using the following wget command and immediately save it as /root/backup-etc.sh:
With this simple command, the script is downloaded from the server and granted appropriate executable permissions.
Benefits and Modifications
The backup-etc.sh script is flexible and can be easily modified to suit different systems. It is default placed in the /var/lib/vz/dump/ folder, which is a standard backup storage location in Proxmox environments. This simplifies backup management and can be easily integrated with existing backup solutions.
By keeping backups for 100 days, we ensure a balance between availability and disk space management. Old copies are automatically deleted, minimizing the risk of disk overflow and reducing data storage costs.
Summary
Automating backups using a bash script and Crontab is an effective method to secure critical system data. The backup-etc.sh script provides simplicity, flexibility, and efficiency, making it an excellent solution for Proxmox system administrators. I encourage you to adapt and modify this script according to your own needs to provide even better protection for your IT environment.
Upgrading Apache Cassandra to a newer version is a significant task that database administrators undertake to ensure their systems benefit from new features, enhanced security measures, and improved performance. This guide provides a detailed walkthrough for upgrading Apache Cassandra from version 3.1.15 and higher to the latest 4.1.x version, specifically on Ubuntu 20.04.5 LTS, with an emphasis on pre-upgrade cleaning operations to manage disk space effectively.
Pre-upgrade Preparation
Backup Configuration Directory:
Before initiating the upgrade, it’s crucial to back up the Cassandra configuration directory. This precaution allows for a swift restoration of the configuration should any issues arise during the upgrade process. Utilize the following command to create a backup, incorporating the current date into the folder name for easy identification:
Preparation is key to a smooth upgrade. Begin with maintenance commands to guarantee data integrity and optimize space usage, especially important for systems with limited disk space.
Scrub Data:
Execute nodetool scrub to clean and reorganize data on disk. Given that this operation may be time-consuming, particularly for databases with large amounts of data or limited disk space, it’s a critical step for a healthy upgrade process.
Clear Snapshots:
To further manage disk space, use nodetool clearsnapshot to remove existing snapshots, freeing up space for the upgrade process. To delete all snapshots on the node, simply use this method if you’re running out of space:
clear all snapshot
Shell
1
# nodetool clearsnapshot --all
Cleanup Data:
Perform a nodetool cleanup to purge unnecessary data. In scenarios where disk space is a premium, it’s advisable to execute a scrub operation without generating a snapshot to conserve space:
scrub cassandra
Shell
1
# nodetool scrub --no-snapshot
Draining and Stopping Cassandra
Drain the Node:
Prior to halting the Cassandra service, ensure all data in memory is flushed to disk with nodetool drain.
drain cassandra
Shell
1
# nodetool drain
Stop the Cassandra Service:
Cease the running Cassandra services to proceed with the upgrade safely:
drain cassandra
Shell
1
# systemctl stop cassandra.service
Upgrading Cassandra
Update Source List:
Edit the repository sources to point to the new version of Cassandra by adjusting the cassandra.sources.list file:
With the repository sources updated, refresh the package list and upgrade the packages. When executing the apt upgrade command, you can keep pressing Enter as the default option is ‘N’ (No):
Upgrade cassandra
Shell
1
# apt update && apt upgrade
Modify Configuration:
Adjust the Cassandra configuration for version 4.1.x by commenting out or deleting deprecated options:
deleting deprecated options in cassandra
Shell
1
# for var in thrift_prepared_statements_cache_size_mb start_rpc rpc_port rpc_server_type thrift_framed_transport_size_in_mb request_scheduler; do sed -i "/$var:/s/^/#/" /etc/cassandra/cassandra.yaml; done
Update JAMM Library:
Ensure the Java Agent Memory Manager (JAMM) library is updated to enhance performance:
change jamm version in cassandra
Shell
1
# sed -i 's|jamm-0.3.0.jar|jamm-0.3.2.jar|g' /etc/cassandra/cassandra-env.sh
Backup and update the JVM options file:
It’s a good practice to back up configuration files before making changes. This step renames the existing jvm-server.options file to jvm-server.options.orig as a backup. Then, it copies the jvm.options file to jvm-server.options to apply the standard JVM options for Cassandra servers.
Post-upgrade, it’s beneficial to evaluate and optimize memory usage and swap space to ensure efficient Cassandra operation:
free ram
Shell
1
# swapoff -a && swapon -a
Restart the Cassandra Service:
Apply the new version by restarting the Cassandra service:
start service cassandra
Shell
1
# systemctl start cassandra.service
Verify Upgrade:
Confirm the success of the upgrade by inspecting the cluster’s topology and state, ensuring all nodes are functional:
verify upgrade of cassandra
Shell
1
2
# nodetool describecluster
# nodetool status
By adhering to this comprehensive guide, database administrators can effectively upgrade Apache Cassandra to version 4.1.x, capitalizing on the latest advancements and optimizations the platform has to offer, while ensuring data integrity and system performance through careful pre-upgrade preparations.
Optimization and Verification
After successfully upgrading Apache Cassandra to version 4.1.x and ensuring the cluster is fully operational, it’s crucial to conduct post-upgrade maintenance to optimize the performance and security of your database system. This section outlines essential steps and considerations to maintain a healthy and efficient Cassandra environment.
Monitor Performance and Logs
In the immediate aftermath of the upgrade, closely monitor the system’s performance, including CPU, memory usage, and disk I/O, to identify any unexpected behavior or bottlenecks. Additionally, review the Cassandra system logs for warnings or errors that may indicate potential issues requiring attention.
Tune and Optimize
Based on the performance monitoring insights, you may need to adjust Cassandra’s configuration settings for optimal performance. Consider tuning parameters related to JVM options, compaction, and read/write performance, keeping in mind the specific workload and data patterns of your application.
Run nodetool upgradesstables
To ensure that all SSTables are updated to the latest format, execute nodetool upgradesstables on each node in the cluster. This operation will rewrite SSTables that are not already in the current format, which is essential for taking full advantage of the improvements and features in Cassandra 4.1.x (Check the space, and if required, delete all snapshots as shown above.):
Upgrade sstables
Shell
1
# time nodetool upgradesstables
This process can be resource-intensive and should be scheduled during off-peak hours to minimize impact on live traffic.
Implement Security Enhancements
Cassandra 4.1.x includes several security enhancements. Review the latest security features and best practices, such as enabling client-to-node encryption, node-to-node encryption, and advanced authentication mechanisms, to enhance the security posture of your Cassandra cluster.
Review and Update Backup Strategies
With the new version in place, reassess your backup strategies to ensure they are still effective and meet your recovery objectives. Verify that your backup and restore procedures are compatible with Cassandra 4.1.x and consider leveraging new tools or features that may have been introduced in this release for more efficient data management.
There are situations when we need to increase the encryption level on the old system – according to the PCI audit requirements. However, the old system is no longer supported, so updating the encryption level is not possible. This is not a recommended solution, because we should try to transfer the application to a new system. After all, when we have little time, it is possible to hide the old version of the system and allow only the new machine to move to it. In this particular example, we will use mod_proxy as a proxy to redirect traffic to the old machine, while using iptables we will only allow communication with the new machine. It is not a recommended solution, but it works and I would like to present it here. The systems that I will be basing on in this example are the old red hat 5 and the new oracle linux 7. Recently, it has become very important to use a minimum of tls 1.2 and none below for banking transactions. Let’s start with the proxy server configuration oracle linux 7.
As of this writing, the addressing is as follows: new_machine IP: 10.10.14.100 old_machine IP: 10.10.14.101 Traffic will be routed on port 443 from new_machine to old_machine.
Before we go to proxy configuration, please make sure there are network transitions from new_machine (10.10.14.100) to old_machine (10.10.14.101) to port 443. You can read how to verify network connections here: check network connection and open tcp port via netcat.
We go to the installation of apache and mod_proxy:
Installing httpd and mod_proxy
Shell
1
# yum install httpd mod_proxy
After installing apache, go to the edition:
Edit configuration apache
Shell
1
# vi /etc/httpd/conf.d/ssl.conf
Below are the news on the check level, what are the updates, and ip on the next service update:
In order to verify the correctness of apache configuration, you can issue a command that will check it:
checking configuration of apache
Shell
1
# service httpd configtest
If the apache configuration is correct, we can proceed to reloading apache:
Restart apache
Shell
1
# service httpd restart
At this point, we have a configured proxy connection. Before we move on to limiting traffic with iptables, I suggest you go to the site – with the new mod_proxy configured and test if everything is working properly and if there are any problems with the application.
Once everything is working fine, the network transitions are there, we can go to the iptables configuration for red hat 5. Let’s start by checking the system version:
checking version red hat
Shell
1
# cat /etc/redhat-release
Now we are going to prepare iptables so that the network traffic is available on port 443 from the new_machine (10.10.14.100). To do this, edit the file /etc/sysconfig/iptables:
edit /etc/sysconfig/iptables
Shell
1
2
3
4
5
6
7
8
9
10
11
12
13
14
# Firewall configuration written by system-config-firewall
# Manual customization of this file is not recommended.
*filter
:INPUT ACCEPT[0:0]
:FORWARD ACCEPT[0:0]
:OUTPUT ACCEPT[0:0]
-AINPUT-mstate--state ESTABLISHED,RELATED-jACCEPT
-AINPUT-picmp-jACCEPT
-AINPUT-ilo-jACCEPT
-AINPUT-ptcp--dport443-s10.10.14.100-jACCEPT
-AINPUT-ptcp--dport443-jDROP
-AINPUT-ptcp--dport80-jDROP
-AINPUT-jACCEPT
COMMIT
After iptables settings are correct, we can reload the service:
Restart iptables
Shell
1
# /etc/init.d/iptables restart
In this way, we managed to cover up the weak encryption by proxying and diverting traffic to the new machine. This is not a recommended solution and you should try to transfer the application to a new environment compatible with the new system. However, in crisis situations, we can use this solution. Network traffic is not allowed by other IP addresses, so scanners will not be able to detect weak encryption on the old machine, and users using the old environment will not be able to use it. This does not change the fact that weak encryption is still set in the old environment and needs to be corrected. The example I gave is for the old red hat 5 and the new oracle linux 7, but it can be assumed that a similar solution and configuration is possible for other versions of the system.