sshfs great tool to mount remote file system
SSHFS (SSH File System) is a secure file transfer system that enables users to remotely access and manage files on a remote server over an encrypted SSH (Secure Shell) connection. SSHFS uses the SSH protocol to establish a secure connection between the local and remote systems, which enables users to securely transfer files between the two systems.
To use SSHFS, the user needs to have SSHFS installed on their local system as well as the remote system that they want to connect to. Once SSHFS is installed, the user can mount the remote system as a local directory on their system, and access the remote files as if they were stored locally.
SSHFS provides a secure and convenient way to access and manage files on remote systems, without the need for additional software or complicated configuration. It also enables users to access files on remote systems using standard file operations, such as copying, moving, and deleting, making it a simple and effective way to manage files on remote systems.
SSH Filesystem (sshfs) is a very useful tool for remotely transferring files over the ssh protocol. An additional advantage of the whole is encryption. This is a convenient way to mount a remote folder to delete files. Below I will try to briefly introduce how to install sshfs and how to mount the folder remotely. Additionally, we will make an entry in /etc/fstab at the end, so that the resource itself is mounted after restarting the system. Let’s move on to installing the tool itself:
|
1 |
# apt install sshfs |
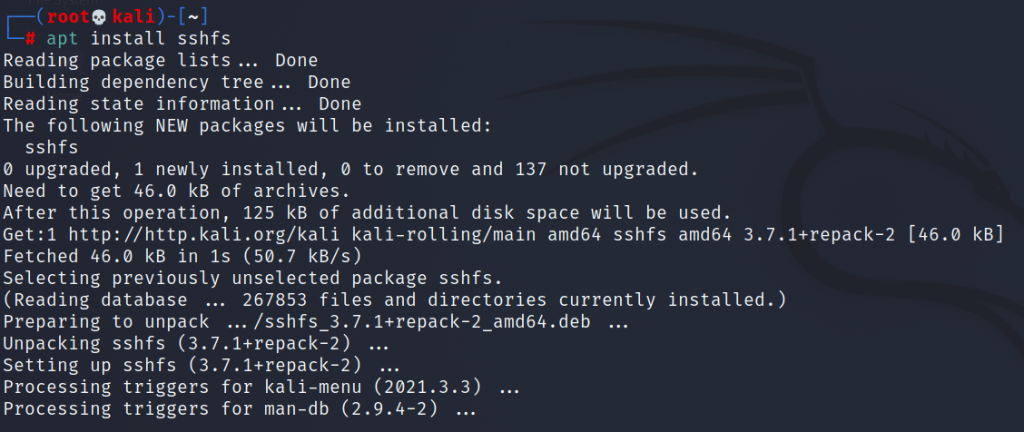
In this case, as you can see, the installation was done on kali linuxe, however the procedure is the same on debian.
Let’s move on to the file mounting itself, at this point I will point out that the default port is 22. In my case, however, the port has been changed to 2222. For services such as ssh, I try to change the default ports so as not to get caught by bots and not end up in the database such as shodan.io. The command itself in this case is very simple, but first we need to create a folder:
|
1 |
$ mkdir /home/kali/myremotedir |

Let’s try to mount a remote folder:
|
1 |
$ sshfs soban@soban.pl:/home/soban/ /home/kali/myremotedir -p 2222 |

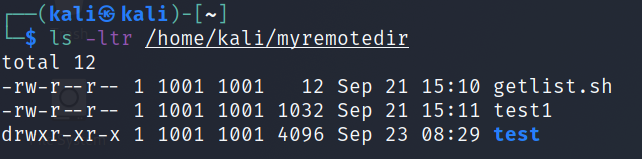
During mounting, we will be asked if the fingerprint is correct. Then for the system password. The command itself can be disassembled into ‘soban‘ – this is the username. Then ‘soban.pl‘ is the domain name, you can also put the IP address here. The next ‘/home/soban‘ element is the folder that will be mounted. And after the space ‘/home/kali/myremotedir‘ we give the folder where the remote folder should be mounted. If everything went as planned, we can list ‘/home/kali/myremotedir‘ and it should list the contents of the remotely mounted folder ‘/home/soban‘. Let’s list the contents of the ‘/home/kali/myremotedir‘ folder:
|
1 |
$ ls -ltr /home/kali/myremotedir |
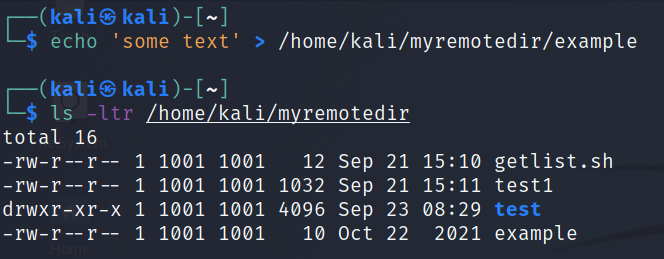
Let’s create a remote file:
|
1 2 |
$ echo 'some text' > /home/kali/myremotedir/example $ ls -ltr /home/kali/myremotedir |
Now let’s unmount the remote folder and try listing it again:
|
1 2 |
$ umount /home/kali/myremotedir $ ls -ltr /home/kali/myremotedir |
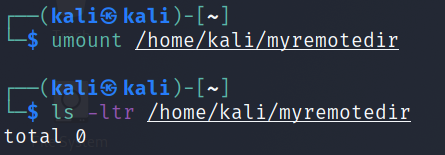
As expected, the folder is empty and the file we created was created on a remotely mounted drive. After unmounting as you can see the file ‘/home/kali/myremotedir/example‘.
The next step is to create a private key to mount the folder without entering a password. It is very important not to send nikmou your private key. How we can generate and add a public key to a remote server can be read here: “Generate SSH key pair in Linux“.
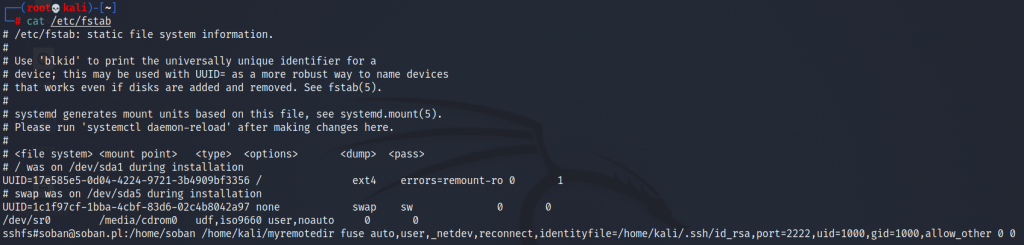
Now we will try to add an entry to /etc/fstab which will allow automatic mounting on startup of the remote folder system.
To do this, edit the /etc/fstab entry and add this entry:
|
1 2 |
#edit this entry and put correct data sshfs#soban@soban.pl:/home/soban /home/kali/myremotedir fuse auto,user,_netdev,reconnect,identityfile=/home/kali/.ssh/id_rsa,port=2222,uid=1000,gid=1000,allow_other 0 0 |
It is important that all data is correct, in order to verify the parameters, you can use the command for this ‘id‘:
|
1 |
# id kali |

Now we can move on to mounting the resource:
|
1 |
# mount /home/kali/myremotedir |

When mounting for the first time, we may be asked to accept and confirm that the fingerprint is correct. After verifying the correctness of mounting the remote resource, we can restart the system. One note here, the system may get up longer.