Increasing the security of the ssh service

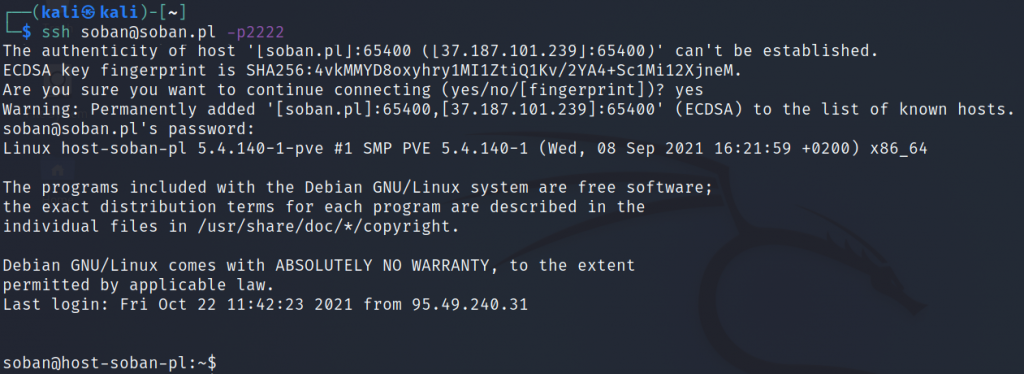
Nowadays, many bots or hackers look for port 22 on servers and try to log in. Usually, the login attempt is made as the standard linuxe root user. In this short article, I will describe how to create a user that will be able to log in as root and change the default ssh port 22 to 2222. Let’s go:

This way we created the user ‘soban’ and assigned it the default shell ‘/bin/bash’.

We still need to set a password for the user ‘soban’:

In the next step, let’s add it to ‘/etc/sudoers’ so that it can become root. Keep in mind that once the user can get root, he will be able to do anything on the machine!

Please add this entry below:

How can we test whether the user has the ability to log in as root? Nothing easier, first we’ll switch to the user we just created:

To list the possible sudo commands, just type the command:

Finally, to confirm whether it is possible to log in as root, you should issue the command:

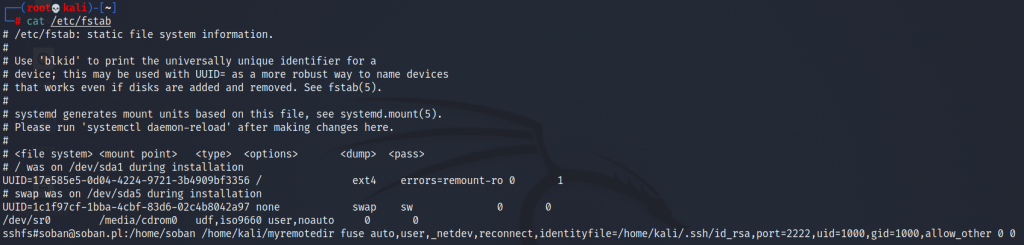
Now that we have a root user ready, let’s try disabling ssh logon directly and change the default port. To do this, go to the default configuration of the ssh service, which is located in ‘/etc/ssh/sshd_config’:

We are looking for a line containing ‘Port’ – it can be hashed, so it should be unhashed and ‘PermitRootLogin’. Then set them as below:

In this way, we changed the default port 22 to 2222 and disallowed the possibility of logging in directly to the root user. However, the ssh service still needs to be reloaded, in debian or kali linux we do it like this:

In this way, we have managed to create a user who can safely log into the ssh service and become root. In addition, after changing the port, we will not go out on port 22 scans, which by default is set and scanned by a potential burglar. Installing the fail2ban service is also a very good improvement in security.

iftop as a good network traffic monitoring tool

iftop is a command-line tool for real-time network bandwidth monitoring. It displays a continuously updated list of network connections along with the amount of data transferred between them. Connections are shown in a table format and can be sorted by bandwidth usage.

iftop provides various filtering options, allowing you to limit the output to specific hosts, networks, or ports. It supports IPv6 and can display source and destination IP addresses, port numbers, and protocols.

It is particularly useful for monitoring traffic in real time and identifying which services or hosts consume the most bandwidth. It can also help detect network performance issues and assist in troubleshooting.

Overall, iftop is a lightweight yet powerful tool and a valuable addition to any network administrator’s toolkit.

One of the most useful network monitoring tools I use is iftop. It becomes especially helpful when the network link is saturated. In practice, it can also help detect abnormal traffic patterns, including DoS attacks. In the example below, I will transfer a large file to a remote machine with a bandwidth limit and observe the traffic using iftop.

First, install iftop on the local machine (in this case, Kali Linux):

iftop installation on kali linux

The distribution does not matter — iftop is available in most Linux repositories, including Debian.

Now install iftop on the remote machine (Debian Linux):

iftop installation on debian linux

To start monitoring network traffic, run iftop with the parameters -PpNn:

iftop running example

Since I am connected to the remote machine via SSH, I can see my active SSH session in the traffic list.

Now let’s go back to the local machine and create a large file:

After creating the 1GB file, let’s transfer it to the remote machine with a bandwidth limit:

scp transfer with bandwidth limit

In this example, the -l 800 option limits the transfer rate to 800 Kbit/s. To convert this to KB/s, divide by 8. That gives approximately 100 KB/s (800 / 8 = 100).

To learn more about scp and secure file transfers over SSH, see: Securely Copy Files (scp) tool for copying files via SSH.

When sending the file, the traffic on the local machine (outgoing traffic) looks like this:

iftop outgoing traffic

At the same time, on the remote machine (incoming traffic) it looks like this:

iftop incoming traffic

As you can see, this approach allows you to observe both outgoing and incoming traffic in real time. Although iftop is simple, it provides powerful visibility into live network activity.

During brute-force attempts, you will usually observe many short-lived connections. In contrast, a DoS attack aims to saturate the bandwidth, which results in high incoming traffic. However, there are situations where traffic spikes are legitimate. In such cases, you may consider limiting connection speed — tools like iptables can help manage that effectively.

Securely Copy Files (scp) tool to copying files by ssh

A very good tool for securely copying files via the ssh protocol between machines is scp. It allows you to transfer files to the target machine as well as download from a given source. The tool is usually built into the system so it works on many distributions. Below I will present how you can send and download files. For correct file transfer, running ssh service is required, because it is the basis of scp operation. Of course, when using the tool, you can specify the port as the parameter, provided that it has been changed. The standard port used by the ssh daemon is 22. 

In Linux, scp (Secure Copy) is a command-line utility used for securely transferring files between local and remote systems. It is a secure alternative to cp, which is not secure when transferring files over a network.

The scp command is commonly used for copying files to or from a remote server. It uses the SSH protocol to securely transfer files and provides the same level of security as SSH. The syntax of the scp command is as follows:

scp [options] [source] [destination]

Here, [source] is the file or directory you want to copy, and [destination] is the location where you want to copy the file or directory.

Some common options used with the scp command are:

  • -r: Copies directories recursively
  • -P: Specifies the port number to use for the SSH connection
  • -i: Specifies the path to the identity file used for authentication

For example, to copy a file named file.txt from a remote server to the local machine, you would use the following command:

scp user@remote:/path/to/file.txt /path/to/local/directory/

This command will copy the file from the remote server to the local machine at the specified directory.

Similarly, to copy a directory named dir from the local machine to a remote server, you would use the following command:

scp -r /path/to/local/dir user@remote:/path/to/remote/directory/

This command will copy the directory and its contents from the local machine to the remote server at the specified directory.

Let’s start by creating an example file that we will transfer: 

in the next step, let’s move on to uploading the file. In my case, the port from ssh has been changed to 2222:

The first time you connect, you will be asked for a fingerprint. 
As you can see, the file has been sent correctly. 

Instead of the sign at the end of ‘~‘ we can specify where the target file should be placed (/tmp/example-path): 

There are many combinations, you can send, for example, all files containing the ending (*.tar.gz) to the user’s home directory, which is just symbolized by ‘~‘: 

An interesting parameter is the ‘-r‘ in scp where we can transfer entire folders, example using copying a folder from local machine to remote machine: 

OK, after the file has been successfully sent to the target machine, let’s delete the local file we created above and try to download it back: 

Next, let’s move on to downloading the file from the remote server to the local machine: 

Above I gave an example of how to send an entire folder from a local machine to a remote machine. The other way around, of course, we can also do it. To download a remote folder to a local machine, use the ‘-r‘ parameter:

The scp utility has more parameters, you can get them by reading the man page: 

It is worth paying attention to the ‘-l‘ parameter where we can set the limit of transferred files. This is useful when transferring larger files so as not to overload your connection. 

If you are tired of constantly entering your password, I encourage you to read how you can connect to ssh without providing a password. Then copying files using scp will become more: generate ssh key pair in linux.

In my opinion, scp is good for transferring files quickly one time. However, as often you exchange files between machines a more convenient way is to use sshfs as described here: sshfs great tool to mount remote file system.

sshfs great tool to mount remote file system

SSHFS (SSH File System) is a secure file transfer system that enables users to remotely access and manage files on a remote server over an encrypted SSH (Secure Shell) connection. SSHFS uses the SSH protocol to establish a secure connection between the local and remote systems, which enables users to securely transfer files between the two systems.

To use SSHFS, the user needs to have SSHFS installed on their local system as well as the remote system that they want to connect to. Once SSHFS is installed, the user can mount the remote system as a local directory on their system, and access the remote files as if they were stored locally.

SSHFS provides a secure and convenient way to access and manage files on remote systems, without the need for additional software or complicated configuration. It also enables users to access files on remote systems using standard file operations, such as copying, moving, and deleting, making it a simple and effective way to manage files on remote systems.

SSH Filesystem (sshfs) is a very useful tool for remotely transferring files over the ssh protocol. An additional advantage of the whole is encryption. This is a convenient way to mount a remote folder to delete files. Below I will try to briefly introduce how to install sshfs and how to mount the folder remotely. Additionally, we will make an entry in /etc/fstab at the end, so that the resource itself is mounted after restarting the system. Let’s move on to installing the tool itself:

In this case, as you can see, the installation was done on kali linuxe, however the procedure is the same on debian.

Let’s move on to the file mounting itself, at this point I will point out that the default port is 22. In my case, however, the port has been changed to 2222. For services such as ssh, I try to change the default ports so as not to get caught by bots and not end up in the database such as shodan.io. The command itself in this case is very simple, but first we need to create a folder:

Let’s try to mount a remote folder:

During mounting, we will be asked if the fingerprint is correct. Then for the system password. The command itself can be disassembled into ‘soban‘ – this is the username. Then ‘soban.pl‘ is the domain name, you can also put the IP address here. The next ‘/home/soban‘ element is the folder that will be mounted. And after the space ‘/home/kali/myremotedir‘ we give the folder where the remote folder should be mounted. If everything went as planned, we can list ‘/home/kali/myremotedir‘ and it should list the contents of the remotely mounted folder ‘/home/soban‘. Let’s list the contents of the ‘/home/kali/myremotedir‘ folder:

Let’s create a remote file:

Now let’s unmount the remote folder and try listing it again:

As expected, the folder is empty and the file we created was created on a remotely mounted drive. After unmounting as you can see the file ‘/home/kali/myremotedir/example‘.

The next step is to create a private key to mount the folder without entering a password. It is very important not to send nikmou your private key. How we can generate and add a public key to a remote server can be read here: “Generate SSH key pair in Linux“.

Now we will try to add an entry to /etc/fstab which will allow automatic mounting on startup of the remote folder system.
To do this, edit the /etc/fstab entry and add this entry:

It is important that all data is correct, in order to verify the parameters, you can use the command for this ‘id‘:

Now we can move on to mounting the resource:

When mounting for the first time, we may be asked to accept and confirm that the fingerprint is correct. After verifying the correctness of mounting the remote resource, we can restart the system. One note here, the system may get up longer.

Generate SSH key pair in Linux

A very convenient way to log into remote systems via ssh is without the use of passwords. Here it is very important not to share your private key with anyone. Currently, when trying to connect, I am asked for the password to the server:

During the connection, we will be asked if the fingerprint is correct. Then enter the user password that is set on the remote server. During the ssh command ‘soban@soban.pl -p2222‘ I gave the username ‘soban‘ then the domain ‘soban.pl‘ and ‘-p2222‘ port ‘2222’. The default port after ssh is 22, but in this case I changed it so that it does not come out on scans – this increases security as often bots / hackers look for port 22, which is the default ssh port set.

Let’s move on to generating the key and copying it to the server:

This is how the key generation looks like, I hit enter for each question:

As a result, a private key was generated: (/home/kali/.ssh/id_rsa) and a public key (/home/kali/.ssh/id_rsa) that we will place on the remote server:

The last time we log in to the server by entering the password. When logging in, we will not be asked for a password now. This way we are able to add our public key (.ssh / authorized_keys) to the remote server.

Netdiscover great tool for scaning and watching local network

Netdiscover is a popular network discovery tool that is used in Linux to identify live hosts on a network. It sends ARP (Address Resolution Protocol) requests to the network and then listens for replies from active hosts. By analyzing the replies, Netdiscover can build a list of all hosts that are currently active on the network.

Netdiscover is typically used by network administrators to identify all devices on a network and to detect any unauthorized devices that may be connected. It can also be used to identify the IP address of a device on a network that is not responding to conventional network scanning techniques.

Netdiscover is a command-line tool and has a range of options that allow it to be customized for specific network environments. For example, it can be set to scan a particular subnet or to use a specific network interface. Additionally, Netdiscover can output its results in a range of formats, including CSV and XML, making it easy to integrate with other tools and applications.

Overall, Netdiscover is a useful tool for network administrators who need to identify all devices on a network and detect any unauthorized devices that may be connected. Its ability to output results in a range of formats and its customizable options make it a versatile and valuable addition to any network security toolkit.

Netdiscover is a great tool to scan your local network for locally attached devices. It is installed by default in Kali Linux. However, if you want to use it on a raspberry pi, you need to install it. You can do this as follows:

In virtualbox I have this setup of network in Kali Linux:

The very use of the tool requires specifying the subnetwork in which we are located. We can check it like this:

In this case, we can scan network 192.168.1.0/24, so in netdiscover we can use:

The screen will show the network scanner:

Netdiscover also gives you the option to direct the result to a file, in this case it refreshes the scan every 2 seconds:

Now we can also use nslookup to get hostname:

Also we can use nmap:

You can use more parameters in nmap for more information, however this will significantly increase the scan time. Still, sometimes it’s worth the wait.

Checking SSL certyfikat date using nmap and curl

This time I will use Kali Linux it is a great distro for pentesters. After all, nothing prevents you from using another distribution, such as Debian Linux.

Sometimes we need to check the certificate issuance date. Nmap and curl are a very good tool for this.
Both of these tools allow for advanced analysis of the SSL connection. Let’s try to check the certificate date with nmap:

To be more precise, let’s leave the date and time alone:

Here is the result:

In my experience nmap is a very good tool – however curl is much faster, to use it, do the following:

$ curl -X GET -i 'https://google.com' | grep -i 'date:' | grep GMT

This is the effect:

It is worth getting acquainted with both tools. Besides checking the date of the certificate, they offer a number of other possibilities.