$ sslscan google.com:443
Version: 2.0.7
OpenSSL 1.1.1k 25 Mar 2021
Connected to 142.250.179.78
Testing SSL server google.com on port 443 using SNI name google.com
SSL/TLS Protocols:
SSLv2 disabled
SSLv3 disabled
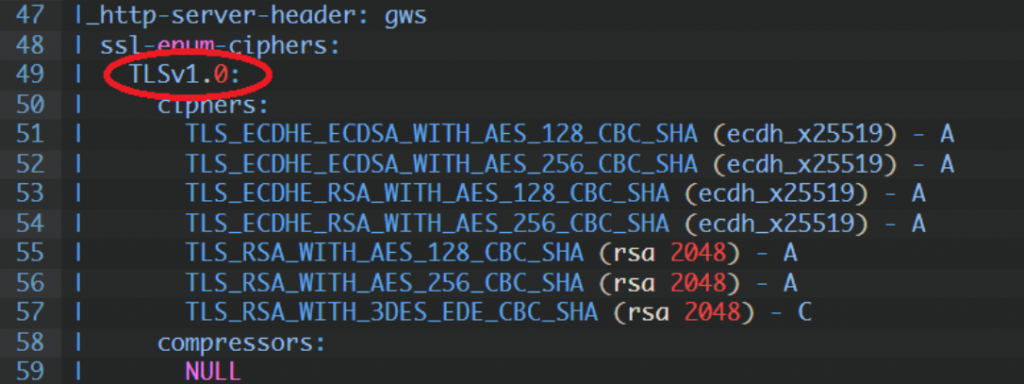
TLSv1.0 enabled
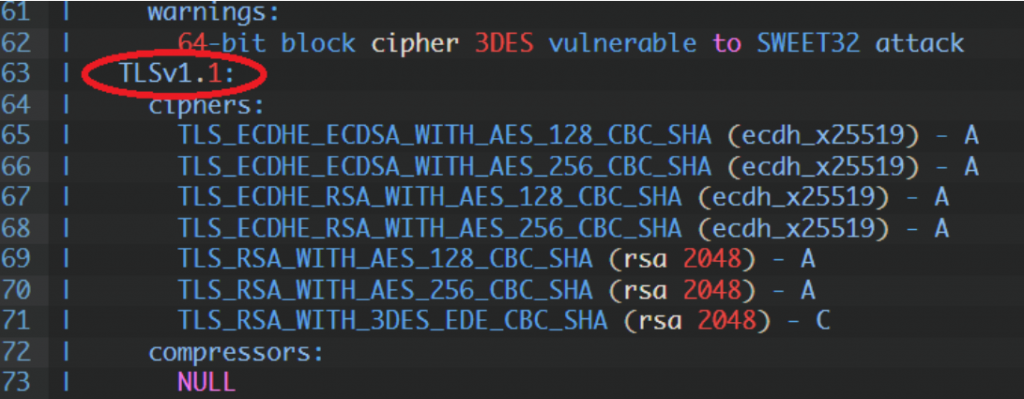
TLSv1.1 enabled
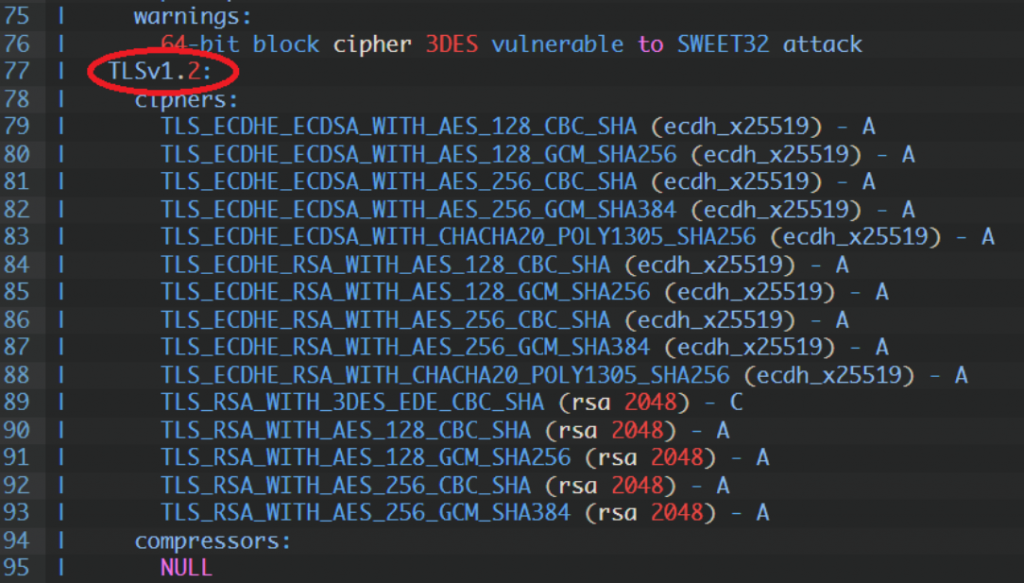
TLSv1.2 enabled
TLSv1.3 enabled
TLS Fallback SCSV:
Server supports TLS Fallback SCSV
TLS renegotiation:
Secure session renegotiation supported
TLS Compression:
OpenSSL version does not support compression
Rebuild with zlib1g-dev package for zlib support
Heartbleed:
TLSv1.3 not vulnerable to heartbleed
TLSv1.2 not vulnerable to heartbleed
TLSv1.1 not vulnerable to heartbleed
TLSv1.0 not vulnerable to heartbleed
Supported Server Cipher(s):
Preferred TLSv1.3 128 bits TLS_AES_128_GCM_SHA256 Curve 25519 DHE 253
Accepted TLSv1.3 256 bits TLS_AES_256_GCM_SHA384 Curve 25519 DHE 253
Accepted TLSv1.3 256 bits TLS_CHACHA20_POLY1305_SHA256 Curve 25519 DHE 253
Preferred TLSv1.2 256 bits ECDHE-ECDSA-CHACHA20-POLY1305 Curve 25519 DHE 253
Accepted TLSv1.2 128 bits ECDHE-ECDSA-AES128-GCM-SHA256 Curve 25519 DHE 253
Accepted TLSv1.2 256 bits ECDHE-ECDSA-AES256-GCM-SHA384 Curve 25519 DHE 253
Accepted TLSv1.2 128 bits ECDHE-ECDSA-AES128-SHA Curve 25519 DHE 253
Accepted TLSv1.2 256 bits ECDHE-ECDSA-AES256-SHA Curve 25519 DHE 253
Accepted TLSv1.2 256 bits ECDHE-RSA-CHACHA20-POLY1305 Curve 25519 DHE 253
Accepted TLSv1.2 128 bits ECDHE-RSA-AES128-GCM-SHA256 Curve 25519 DHE 253
Accepted TLSv1.2 256 bits ECDHE-RSA-AES256-GCM-SHA384 Curve 25519 DHE 253
Accepted TLSv1.2 128 bits ECDHE-RSA-AES128-SHA Curve 25519 DHE 253
Accepted TLSv1.2 256 bits ECDHE-RSA-AES256-SHA Curve 25519 DHE 253
Accepted TLSv1.2 128 bits AES128-GCM-SHA256
Accepted TLSv1.2 256 bits AES256-GCM-SHA384
Accepted TLSv1.2 128 bits AES128-SHA
Accepted TLSv1.2 256 bits AES256-SHA
Accepted TLSv1.2 112 bits TLS_RSA_WITH_3DES_EDE_CBC_SHA
Preferred TLSv1.1 128 bits ECDHE-ECDSA-AES128-SHA Curve 25519 DHE 253
Accepted TLSv1.1 256 bits ECDHE-ECDSA-AES256-SHA Curve 25519 DHE 253
Accepted TLSv1.1 128 bits ECDHE-RSA-AES128-SHA Curve 25519 DHE 253
Accepted TLSv1.1 256 bits ECDHE-RSA-AES256-SHA Curve 25519 DHE 253
Accepted TLSv1.1 128 bits AES128-SHA
Accepted TLSv1.1 256 bits AES256-SHA
Accepted TLSv1.1 112 bits TLS_RSA_WITH_3DES_EDE_CBC_SHA
Preferred TLSv1.0 128 bits ECDHE-ECDSA-AES128-SHA Curve 25519 DHE 253
Accepted TLSv1.0 256 bits ECDHE-ECDSA-AES256-SHA Curve 25519 DHE 253
Accepted TLSv1.0 128 bits ECDHE-RSA-AES128-SHA Curve 25519 DHE 253
Accepted TLSv1.0 256 bits ECDHE-RSA-AES256-SHA Curve 25519 DHE 253
Accepted TLSv1.0 128 bits AES128-SHA
Accepted TLSv1.0 256 bits AES256-SHA
Accepted TLSv1.0 112 bits TLS_RSA_WITH_3DES_EDE_CBC_SHA
Server Key Exchange Group(s):
TLSv1.3 128 bits secp256r1 (NIST P-256)
TLSv1.3 128 bits x25519
TLSv1.2 128 bits secp256r1 (NIST P-256)
TLSv1.2 128 bits x25519
SSL Certificate:
Signature Algorithm: sha256WithRSAEncryption
ECC Curve Name: prime256v1
ECC Key Strength: 128
Subject: *.google.com
Altnames: DNS:*.google.com, DNS:*.appengine.google.com, DNS:*.bdn.dev, DNS:*.cloud.google.com, DNS:*.crowdsource.google.com, DNS:*.datacompute.google.com, DN
S:*.google.ca, DNS:*.google.cl, DNS:*.google.co.in, DNS:*.google.co.jp, DNS:*.google.co.uk, DNS:*.google.com.ar, DNS:*.google.com.au, DNS:*.google.com.br, DN
S:*.google.com.co, DNS:*.google.com.mx, DNS:*.google.com.tr, DNS:*.google.com.vn, DNS:*.google.de, DNS:*.google.es, DNS:*.google.fr, DNS:*.google.hu, DNS:*.g
oogle.it, DNS:*.google.nl, DNS:*.google.pl, DNS:*.google.pt, DNS:*.googleadapis.com, DNS:*.googleapis.cn, DNS:*.googlevideo.com, DNS:*.gstatic.cn, DNS:*.gsta
tic-cn.com, DNS:*.gstaticcnapps.cn, DNS:googlecnapps.cn, DNS:*.googlecnapps.cn, DNS:googleapps-cn.com, DNS:*.googleapps-cn.com, DNS:gkecnapps.cn, DNS:*.gkecn
apps.cn, DNS:googledownloads.cn, DNS:*.googledownloads.cn, DNS:recaptcha.net.cn, DNS:*.recaptcha.net.cn, DNS:widevine.cn, DNS:*.widevine.cn, DNS:ampproject.o
rg.cn, DNS:*.ampproject.org.cn, DNS:ampproject.net.cn, DNS:*.ampproject.net.cn, DNS:google-analytics-cn.com, DNS:*.google-analytics-cn.com, DNS:googleadservi
ces-cn.com, DNS:*.googleadservices-cn.com, DNS:googlevads-cn.com, DNS:*.googlevads-cn.com, DNS:googleapis-cn.com, DNS:*.googleapis-cn.com, DNS:googleoptimize
-cn.com, DNS:*.googleoptimize-cn.com, DNS:doubleclick-cn.net, DNS:*.doubleclick-cn.net, DNS:*.fls.doubleclick-cn.net, DNS:*.g.doubleclick-cn.net, DNS:doublec
lick.cn, DNS:*.doubleclick.cn, DNS:*.fls.doubleclick.cn, DNS:*.g.doubleclick.cn, DNS:dartsearch-cn.net, DNS:*.dartsearch-cn.net, DNS:googletraveladservices-c
n.com, DNS:*.googletraveladservices-cn.com, DNS:googletagservices-cn.com, DNS:*.googletagservices-cn.com, DNS:googletagmanager-cn.com, DNS:*.googletagmanager
-cn.com, DNS:googlesyndication-cn.com, DNS:*.googlesyndication-cn.com, DNS:*.safeframe.googlesyndication-cn.com, DNS:app-measurement-cn.com, DNS:*.app-measur
ement-cn.com, DNS:gvt1-cn.com, DNS:*.gvt1-cn.com, DNS:gvt2-cn.com, DNS:*.gvt2-cn.com, DNS:2mdn-cn.net, DNS:*.2mdn-cn.net, DNS:googleflights-cn.net, DNS:*.goo
gleflights-cn.net, DNS:admob-cn.com, DNS:*.admob-cn.com, DNS:*.gstatic.com, DNS:*.metric.gstatic.com, DNS:*.gvt1.com, DNS:*.gcpcdn.gvt1.com, DNS:*.gvt2.com,
DNS:*.gcp.gvt2.com, DNS:*.url.google.com, DNS:*.youtube-nocookie.com, DNS:*.ytimg.com, DNS:android.com, DNS:*.android.com, DNS:*.flash.android.com, DNS:g.cn,
DNS:*.g.cn, DNS:g.co, DNS:*.g.co, DNS:goo.gl, DNS:www.goo.gl, DNS:google-analytics.com, DNS:*.google-analytics.com, DNS:google.com, DNS:googlecommerce.com,
DNS:*.googlecommerce.com, DNS:ggpht.cn, DNS:*.ggpht.cn, DNS:urchin.com, DNS:*.urchin.com, DNS:youtu.be, DNS:youtube.com, DNS:*.youtube.com, DNS:youtubeeducat
ion.com, DNS:*.youtubeeducation.com, DNS:youtubekids.com, DNS:*.youtubekids.com, DNS:yt.be, DNS:*.yt.be, DNS:android.clients.google.com, DNS:developer.androi
d.google.cn, DNS:developers.android.google.cn, DNS:source.android.google.cn
Issuer: GTS CA 1C3
Not valid before: Aug 30 01:36:08 2021 GMT
Not valid after: Nov 22 01:36:07 2021 GMT


